Pages

Basic PHP Crash Course (part 6)

Thursday, April 19, 2012
In the early posts, we do not save the order data. To deliver the user order, we have to save the order data permanently. To do so we will need suitable database server. I will use MySQL.

What is MySQL?

MySQL is a Relational Database Management System. It can store, search, sort and retrieve data efficiently. You can use it freely under the GPL license. You can check more about MySQL in its official website www.mysql.com

What do we need?

In this series, we will learn about MySQL by using phpMyAdmin. It will make you more easy to create a database by using phpMyAdmin than command line because it is a GUI(Graphical User Interfaces) system. To use phpMyAdmin you don't need to install anything if you have installed xampp or wamp as mentioned in this post.
Type this address "http://localhost/phpmyadmin/" in your browser address bar. You will see like below screenshot.


Creating our Database

Click Databases from the menu.


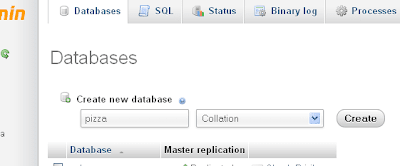
Type in the text box as pizza for the database name and click "Create" button.


You will see your database name in the left menu like below screenshot.


Click your database name. You will see like below screenshot.


Type order in the Name field and type 4 in the Number of columns field like below screenshot. And then click Go button to crate a database table.


Now you need to fill the field name, type etc. like below screenshot.


A database table should have a primary key. So for our order table id field should be the primary key. Select in the Index select box as PRIMARY and set the A_I(AUTO_INCREMENT) check box that will increase automatically our id field number.


Then click Save button.


Now you have created a database table to save your customer order.

PHP and MySQL

It is time to connect the MySQL database by using PHP.
Firstly I want to introduce you to the PHP built-in functions that can connect to the MySQL.

mysqli_connect("hostname","username","password","databasename")

Above function will help you to connect the MySQL database. So you need to know the parameter values.
hostname - Hostname running database server. Default is localhsot. For our xampp or wamp is also localhost.
username - Our xampp or wamp default username is root.
password - Our xampp or wamp default password is blank(no password).
databasename - Our database name is pizza.

You need to add below code to our process.php.

<?php
$con = mysqli_connect('localhost','root','','pizza') or die(mysqli_error());
$sql="INSERT INTO `order` (`name`, `address`, `quantity`) VALUES ('$cus_name', '$address', '$quantity')";
mysqli_query($con,$sql) or die(mysqli_error());
?>


First line will connect to our MySQL sever and it will also return a object which represents the connection to a MySQL Server or FALSE if the connection failed. We need to use this return object in other php function.
In second line, I create a variable of SQL statement that will use in the query function. We can write this SQL statement in the query function directly but we do so for the simplicity. This SQL statement will insert the post data from user order to the order table of our pizza database.
The third line will run our SQL Query.
Our process.php file will be like below.

<?php
 $title = "Pizza Shop: Order Process";
 include('header.php');
 include('sidebar.php');
?>
<div id="content">
<?php
 if(isset($_POST['submit']))
 {
  if( $_POST['cus_name'] != '' && $_POST['quantity'] != '' && $_POST['address'] !='' )
  {
   $cus_name = $_POST['cus_name'];
   $quantity = $_POST['quantity'];
   $address = $_POST['address'];

   $con = mysqli_connect('localhost','root','','pizza') or die(mysqli_error());
   $sql="INSERT INTO `order` (`name`, `address`, `quantity`) VALUES ('$cus_name', '$address', '$quantity')";
   mysqli_query($con,$sql) or die(mysqli_error());
?>
 <p>Thank <?php echo $cus_name; ?> !</p>
 <p>You order <?php echo $quantity; ?> pizza.</p>
 <?php
  $total = $quantity * 10;
 ?>
 <p>It will cost you <?php echo $total; ?> $.</p>
 <p>We will send withing 2 hours to <?php echo $address; ?>.</p>
 <?php
 }
 else
 {
  $_SESSION['error'] = "You need to fill all data";
  header("location: index.php");
 }
 ?>
<?php } ?>
</div><!--end of content -->
<?php
 include('footer.php');
?>
Read more ...

Basic PHP Crash Course (part 5)

Monday, April 9, 2012
This post is part 5 of the Basic PHP Crash Course. If you have never red before this Crash Course, you should read part 1, part 2, part 3 and part 4 first. In this post, we will discuss about our site design or template. For a website it will has header, sidebar, content and footer. So we need to add some html code to our index.php. Following code is our index.php.
<?php session_start(); ?>
<html>
<head>
 <link href="styles.css" rel="stylesheet" type="text/css">
 <title>Pizza Shop: Home</title>
</head>
<body>
 <div id="wrapper">
 <div id="header">
  <h1>Pizza Shop</h1>
 </div><!--end of header -->

 <div id="sidebar">
  <h2>Sidebar</h2>
 </div><!--end of sidebar -->

 <div id="content">
 <?php 
  if($_SESSION['error'] != '')
  {
   echo $_SESSION['error']; 
   $_SESSION['error']='';
  }
 ?>
 <h3>Pizza Shop Order Form</h3>
 <form class="order" action="process.php" method="post">
  <p>
  <label for="cus_name">Customer Name:</label>
  <input type="text" name="cus_name" />
  </p>
  <p>
  <label for="address">Shipping Address:</label>
  <input type="text" name="address" />
  </p>
  <p>
  <label for="quantity">Pizza Quantity:</label>
  <input type="text" name="quantity" />
  </p>
  <p>
  <input type="submit" name="submit" value="Submit Order" />
  </p>
 </form>
 </div><!--end of content -->

 <div id="footer">
  Pizza Shop &copy; 2011
 </div><!--end of footer -->

 </div><!--end of wrapper -->
</body>
</html>
I also create a css file named styles.css like following.
body{
 margin:0px;
 padding:0px;
}
#wrapper{
 width:960px;
 margin:0 auto;
 background-color:#FFC;
}
#header{
 height:90px;
 background-color: #FC0;
}
#header h1{
 color:#FFF;
 padding:10px 0px 0px 10px;
}
#content{
 padding:20px;
 float:left;
}
.order label{
 width:150px;
 float:left;
}
#sidebar{
 width:250px;
 height:300px;
 background-color: #C00;
 float:left;
}
#footer{
 clear:both;
 height:40px;
 background-color:#FC0;
 text-align:center;
}
Now if you run our site, you will see like below.
We have a problem. For our process.php we also need to add the html code that added to our index.php. You can add the needed code to that page. But if you have many files, you need to add every page and if you want to change some code, you will change many files. PHP has a very useful statement include() to solve this problem. It will include and evaluate the specific file. Before we use the include() statement, we will separate the duplicated coed as the separated file. Type the following code and save as header.php.
<?php session_start(); ?>
<html>
<head>
 <link href="styles.css" rel="stylesheet" type="text/css">
 <title>Pizza Shop: Home</title>
</head>
<body>
 <div id="wrapper">

 <div id="header">
  <h1>Pizza Shop</h1>
 </div><!--end of header -->
Type the following code and save as sidebar.php.
<div id="sidebar">
 <h2>Sidebar</h2>
</div><!--end of sidebar -->
Type the following code and save as footer.php.
<div id="footer">
 Pizza Shop &copy; 2011
</div><!--end of footer -->

</div><!--end of wrapper -->
</body>
</html>
Now our index.php will be like below by using include() statement.
<?php
 include('header.php');
 include('sidebar.php');
?>
<div id="content">
<?php 
 if($_SESSION['error'] != '')
 {
  echo $_SESSION['error']; 
  $_SESSION['error']='';
 }
?>
<h3>Pizza Shop Order Form</h3>
<form class="order" action="process.php" method="post">
 <p>
 <label for="cus_name">Customer Name:</label>
 <input type="text" name="cus_name" />
 </p>
 <p>
 <label for="address">Shipping Address:</label>
 <input type="text" name="address" />
 </p>
 <p>
 <label for="quantity">Pizza Quantity:</label>
 <input type="text" name="quantity" />
 </p>
 <p>
 <input type="submit" name="submit" value="Submit Order" />
 </p>
</form>
</div><!--end of content -->
<?php
 include('footer.php');
?>
Our process.php file will be like below.
<?php
 include('header.php');
 include('sidebar.php');
?>
<div id="content">
<?php
 if(isset($_POST['submit']))
 {
  if( $_POST['cus_name'] != '' && $_POST['quantity'] != '' && $_POST['address'] !='' )
  {
   $cus_name = $_POST['cus_name'];
   $quantity = $_POST['quantity'];
   $address = $_POST['address'];
?>
<p>Thank <?php echo $cus_name; ?> !</p>
<p>You order <?php echo $quantity; ?> pizza.</p>
<?php
$total = $quantity * 10;
?>
<p>It will cost you <?php echo $total; ?> $.</p>
<p>We will send withing 2 hours to <?php echo $address; ?>.</p>
<?php
  }
  else
  {
   $_SESSION['error'] = "You need to fill all data";
   header("location: index.php");
  }
?>
<?php } ?>
</div><!--end of content -->
<?php
 include('footer.php');
?>
Our template system is almost finished. Let's think about our page title. It is not flexible. I want to change my title when the page change. To do so we need to create a variable and set our title to this variable before loading the header.php. And then we can use this variable in our header.php. Below is our index.php.
<?php
 $title = "Pizza Shop: Home";
 include('header.php');
 include('sidebar.php');
?>
...
Our process.php file will be like below.
<?php
 $title = "Pizza Shop: Order Process";
 include('header.php');
 include('sidebar.php');
?>
...
Our header.php will be like below.
<?php session_start(); ?>
<html>
<head>
 <link href="styles.css" rel="stylesheet" type="text/css">
 <title><?php echo $title; ?></title>
</head>
<body>
 <div id="wrapper">

 <div id="header">
  <h1>Pizza Shop</h1>
 </div><!--end of header -->
Read more ...

Basic PHP Crash Course (part 4)

Tuesday, April 3, 2012
This post is part 4 of the Basic PHP Crash Course. If you have never red before this Crash Course, you should read part 1, part 2 and part 3 first. In this post we will discuss about PHP Session. It is very useful when you write a web application. Let's think about our pizza shop website. After the user have submitted the order form, our application will call the process.php. Then I want to show the order form again, if the submitted form has the errors. To do so, we have a problem. We cannot know the error data from process.php when we show the order form again. So we must use PHP Session.

What is PHP Session?

Session is a way to store information for the individual user in our server by using session ID. This ID is automatically generated by PHP and store also on the user computer for the lifetime of a session. The content of the session data is store at the server.

Simple Example

<?php session_start(); ?>
<html>
<head>
 <title>Page 1</title>
</head>
<body>
<?php
 $_SESSION['user_name'] = "John";
?>
</body>
</html>
Before we use the session data, we need to load session_start() function. This function will check whether there is already a session. If not, it will create one. Now we can use the superglobal $_SESSION array. So I set the user_name as John. Below is the another page.
<?php session_start(); ?>
<html>
<head>
 <title>Page 2</title>
</head>
<body>
<?php
 echo "Hi ".$_SESSION['user_name'];
?>
</body>
</html>
In this page, we echo the user_name from session data array. If you run the page2, you will see "Hi John". In this way, you can save the data you need for other page. However session data is not permanent storage. For permanent storage, we will use the database like MySql(I will also explain about MySql database later in this series.).

Enhancing our pizza shop website

Now it is time to enhance our pizza shop site. Below is our index.php.
<?php session_start(); ?>
<html>
<head>
 <title>Order Process</title>
</head>
<body>
<?php
 if(isset($_POST['submit']))
 {
  if( $_POST['cus_name'] != '' && $_POST['quantity'] != '' && $_POST['address'] !='' )
  {
   $cus_name = $_POST['cus_name'];
   $quantity = $_POST['quantity'];
   $address = $_POST['address'];
?>
 <p>Thank <?php echo $cus_name; ?> !</p>
 <p>You order <?php echo $quantity; ?> pizza.</p>
<?php
 $total = $quantity * 10;
?>
 <p>It will cost you <?php echo $total; ?> $.</p>
 <p>We will send withing 2 hours to <?php echo $address; ?>.</p>
<?php
 }
 else
 {
  $_SESSION['error'] = "You need to fill all data.";
  header("location: index.php");
 }
?>
<?php } ?>
</body>
</html>
As you know, firstly we need to call the session_start() function to use the session data. If the user submit the form without filling all data, we will set the session error data as "You need to fill all data.". And then redirect our site to index.php by using header() function. This function will tell the browser to load the page that you send as parameter. In our index.php file, we will also start with session_start() function. Then we will retrieve the error data from the session array and will echo before our order form. Below is our index.php.
<?php session_start(); ?>
<html>
<head>
 <title>Pizzs Show: Home</title>
</head>
<body>
<?php 
 if($_SESSION['error'] != '')
 {
  echo $_SESSION['error']; 
  $_SESSION['error']='';
 }
?>
 <h3>Pizza Shop Order Form</h3>
 <form action="process.php" method="post">
 <p>
  <label for="cus_name">Customer Name:</label>
  <input type="text" name="cus_name" />
 </p>
 <p>
  <label for="address">Shipping Address:</label>
  <input type="text" name="address" />
 </p>
 <p>
  <label for="quantity">Pizza Quantity:</label>
  <input type="text" name="quantity" />
 </p>
 <p>
  <input type="submit" name="submit" value="Submit Order" />
 </p>
 </form>
</body>
</html>
Read more ...