Pages

Showing posts with label PHP. Show all posts

Regular expression in PHP (part 1)

Tuesday, September 11, 2012
We deal with at least one form on almost every project. So we need to validate this form. You can do the validation with javascript on the client side. But we also need to validate on the server side because user can turn off the javascript.

To do the form validation on the server side, we need to understand about the regular expression.

Let's start with the simple example.
<?php
$string = "webinone";
echo preg_match("/in/", $string);
?>
The above code will echo 1 because the characters "in" are found in our string.
The below code will echo 0.
<?php
$string = "webinone";
echo preg_match("/ni/", $string); //output: 0

echo preg_match("/IN/", $string); //output: 0
?>

Metacharacters

caret ^

Start of the string
<?php
$string = 'webinone';
echo preg_match("/^we/", $string); //output: 1

echo preg_match("/^eb/", $string); //output: 0
?>
The caret has another usage. I will show you in a moment.

dollor $

End of the string
<?php
$string = 'webinone';
echo preg_match("/one$/", $string); //output: 1

echo preg_match("/noe$/", $string); //output: 0
?>

Character Class []

If you code like [aeiou], it will return 1 when our string has one of the vowel.
<?php
$string = 'big';
echo preg_match("/[aeiou]/", $string); //Output: 1

$string1 = 'baig';
echo preg_match("/[aoiu]/", $string1); //Output: 1

$string2 = 'bag';
echo preg_match("/b[aoiu]g/", $string2); //Output: 1

$string3 = 'beg';
echo preg_match("/b[aoiu]g/", $string3); //Output: 0

$string4 = 'baog';
echo preg_match("/b[aoiu]g/", $string4); //Output: 0
?>
We used the caret ^ for the meaning of the start of the string. But if you use the caret ^ within the [], it means NOT.
<?php
$string = 'webinone';
if(preg_match("/[^a]/",$string))
{
 echo 'String has no a.';
}
?>
By the way if you use the $ withing [], it is not the end of string. It just a simple dollar sign and contains no special meaning within it.

We can use the - for the range of character class. [a-f] is equal to [abcdef].
<?php
$string = 'webinone';
echo preg_match("/[a-z]/", $string); //Output: 1

$string1 = 'WebInOne';
echo preg_match("/[a-z]/", $string1); //Output: 1

$string2 = 'WEBINONE';
echo preg_match("/[a-z]/", $string2); //Output: 0

$string3 = '12345';
echo preg_match("/[a-zA-Z]/", $string3); //Output: 0

$string4 = '12345';
echo preg_match("/[^0-9]/", $string4); //Output: 0
?>

Dot .

Any single character except new line (n).
<?php
$string = 'one';
echo preg_match("/./", $string); //Output: 1

$string1 = 'one';
echo preg_match("/[.]/", $string1); //Output: 0

$string2 = 'one';
echo preg_match("/o.e/", $string2); //Output: 1

$string3 = 'ons';
echo preg_match("/o.e/", $string3); //Output: 0

$string4 = 'onne';
echo preg_match("/o.e/", $string4); //Output: 0

$string5 = "ore";
echo preg_match("/o.e/", $string5); //Output: 1

$string6 = "one";
echo preg_match("/o.e/", $string6); //Output: 0
?>
 

Asterix *

a* means 0 or more of a. We need to see the little complicate example to know its usage.
<?php
$string = "<html>";
echo preg_match("/<[A-Za-z][A-Za-z0-9]*>/", $string); //Output: 1

$string1 = "<b>";
echo preg_match("/<[A-Za-z][A-Za-z0-9]*>/", $string1); //Output: 1

$string2 = "<h3>";
echo preg_match("/<[A-Za-z][A-Za-z0-9]*>/", $string2); //Output: 1

$string3 = "<3>";
echo preg_match("/<[A-Za-z][A-Za-z0-9]*>/", $string3); //Output: 0
?>
In the above example we use <[A-Za-z][A-Za-z0-9]*>. In this regex, < and > are literal characters. The first character class matches a letter. The second character class matches a letter or digit. The star repeats the second character class. Because we used the star, it's OK if the second character class matches nothing. So our regex will match a tag like <B>. When matching <HTML>, the first character class will match H. The star will cause the second character class to be repeated three times, matching T, M and L with each step.

Plus +

a+ mean one or more of a.
<?php
$string = "php";
echo preg_match("/ph+p/", $string); //Output: 1

$string1 = "phhp";
echo preg_match("/ph+p/", $string1); //Output: 1

$string2 = "pp";
echo preg_match("/ph+p/", $string2); //Output: 0

$string3 = "12345";
echo preg_match("/[a-z]+/", $string3); //Output: 0
?>

Question mark ?

a? Zero or one of a.
<?php
$string = "123456";
echo preg_match("/123-?456/", $string); //Output: 1

$string1 = "123-456";
echo preg_match("/123-?456/", $string1); //Output: 1

$string2 = "123--456";
echo preg_match("/123-?456/", $string2); //Output: 0
?>

Curly braces {}

a{3} Exactly 3 of a
a{3,} 3 or more of a
a{,3} Up to 3 of a
a{3,6} 3 to 6 of a

<?php
$string = "google";
echo preg_match("/go{2}gle/", $string); //Output: 1

$string1 = "gooogle";
echo preg_match("/go{2}gle/", $string1); //Output: 0

$string2 = "gooogle";
echo preg_match("/go{2,}gle/", $string2); //Output: 1

$string3 = "google";
echo preg_match("/go{,2}gle/", $string3); //Output: 0

$string4 = "google";
echo preg_match("/go{2,3}gle/", $string4); //Output: 1
?>

Subpattern ()

<?php
$string = "This is PHP.";
echo preg_match("/^(This)/", $string); //Output: 1

$string1 = "That is PHP.";
echo preg_match("/^(This)/", $string1); //Output: 0

$string2 = "That is PHP.";
echo preg_match("/^([0-9])/", $string2); //Output: 0

$string3 = "7 is lucky number.";
echo preg_match("/^([0-9])/", $string3); //Output: 1
?>

Logical Or |


<?php
$string = "This is PHP.";
echo preg_match("/^(This|That)/", $string); //Output: 1

$string1 = "That is PHP.";
echo preg_match("/^(This|That)/", $string1); //Output: 1
?>

Backslash /

Where we use backslash?
If you want to use these eleven metacharacters ^+*.?$()|[ as literal characters in your regex, we need to escape them with a backslash.
<?php
$string = 'webinone.net';
if(preg_match("/./",$string))
{
 echo 'String has dot.';
}
$string1 = 'webinone+net';
if(preg_match("/+/",$string1))
{
 echo 'String has + sign.';
}
?>

Now let's try the real world example. Below example is to test for the email validation. It is not a prefect one, but it will validate most common email address formats correctly.

Crate a blank document in your favourite editor and paste following code in your document. And then save as mail_regex.php in your www (in wamp) folder.
<html>
<head>
 <title>Mail text</title>
</head>
<body>
<?php
 if(isset($_POST['submit']))
 {
  $email = $_POST['email'];
  if(preg_match("/^[a-zA-Z0-9._%-]+@[a-zA-Z0-9.-]+.[a-zA-Z]{2,4}$/", $email))
  echo "Valid mail";
  else
  echo "Not Valid";
 }
?>
<form method="post" action="mail_regex.php">
 <input type="text" name="email" id="email" size="30" />
 <input name="submit" type="submit" value="Submit"/>
</form>
</body>
</html>

Our regex pattern for the email address is like below:
^[a-zA-Z0-9._%-]+@[a-zA-Z0-9.-]+.[a-zA-Z]{2,4}$
As you know, email address are always in a particular format:

username @ domain . extension

For our username part we use

^[a-zA-Z0-9._%-]+

^ means our username must start with this character class [a-zA-Z0-9._%-].
+ follow by the character class so you must enter one or more of the previous character class.

For our domain part we use

[a-zA-Z0-9.-]+

Our domain name must present one or more of that character class.

And then we need to escape with the backslash to use the . as the literal character.

For the extension part we use

[a-zA-Z]{2,4}$

So your extension must present 2 to 4 of the previous character class.

Now you can create some of the regex patterns by yourself I think.

There are many other regex patterns in PHP. I will explain you the rest of other regex patterns in the part 2.

Ref:

phpro.org

regular-expressions.info
Read more ...

Navigation System or Template with PHP and jQuery

Thursday, May 24, 2012
In this tutorial I will explain you how to create a navigation system or dynamic menu system or simple template system by using php include function, $_SESSION and some jQuery function.

Below screenshot is our latest view.

In this tutorial we will create 7 files like below.

You can see demo here.

Demo

1. header.php - It is a header part of our template. It will also include main menu.
2. jquery.js - It is a jquery library file downloaded from jQuery and rename it as jquery.js.
3. style.css - It is a style sheet for our site.
4. index.php - It will load firstly when we run our site or it is our home page.
5. footer.php - It is a footer part of our template.
6. projects.php - It is a other content file.
7. about.php - It is another content file.

Our page source code will be look like this before using php include function.
<!DOCTYPE html>
<html>
<head>
<meta http-equiv="Content-Type" content="text/html; charset=utf-8" />
<link rel="stylesheet" type="text/css" href="style.css" media="screen" />
<script type="text/javascript" src="jquery.js"></script>
<title>Home</title>
</head>

<body>
<div id="wrapper">

<div id="header">
 <h1>Your Site Name</h1>
</div><!-- end of header-->

<ul id="main_nav">
 <li><a id="home" href="index.php">Home</a></li>
 <li><a id="projects" href="projects.php">Projects</a></li>
 <li><a id="about" href="about.php">About Us</a></li>
</ul>

<div id="content">
 <h1>Welcome to our Site.</h1>
 Your content will be here.
</div>

<div id="footer">
 Created by <a href="http://www.webinone.net">WebInOne</a>
</div><!-- end of footer-->

</div><!-- end of wrapper-->
</body>
</html>
When we create a website, we will have many pages like above code. In every page, header part and footer part will be present. So we should create the separate file for this duplicate code as header.php and footer.php. The only thing we need to change is content part. So our index.php file will be look like this.

<?php
 include("header.php");
?>
<div id="content">
 <h1>Welcome to our Site.</h1>
 Your content will be here.
</div>
<?php
 include("footer.php");
?>

I will explain you about the header.php and footer.php in a moment. Now we need to add some code to our index.php to set the title and menu item dynamically by using php $_SESSION.
<?php
 session_start();
 $_SESSION['title']='Home';
 $_SESSION['menu']='home';
 include("header.php");
?>
<div id="content">
 <h1>Welcome to our Site.</h1>
 Your content will be here.
</div>
<?php
 include("footer.php");
?>

Our header.php will look like below. I also add some jquery code to highlight the current location on main menu.
<!DOCTYPE html>
<html>
<head>
<meta http-equiv="Content-Type" content="text/html; charset=utf-8" />
<link rel="stylesheet" type="text/css" href="style.css" media="screen" />
<script type="text/javascript" src="jquery.js"></script>
<title><?php echo $_SESSION['title']; ?></title>
<script type="text/javascript">
 function getMenuVar()
 {
  var route=document.getElementById("for_current").value;
  return route;
 }
 $(document).ready(function() {
  route = getMenuVar();
  if (route == 'home') {
   $('#home').addClass('current');
  } else if (route == 'projects') {
   $('#projects').addClass('current');
  } else if (route == 'about') {
   $('#about').addClass('current'); 
  } else {
   $('#home').addClass('');
  }
 }); 
</script>
</head>
<body>
<div id="wrapper">

<div id="header">
 <h1>Your Site Name</h1>
</div><!-- end of header-->
 <input type="hidden" id="for_current" value="<?php echo $_SESSION['menu']; ?>" name="for_current" />
 <ul id="main_nav">
  <li><a id="home" href="index.php">Home</a></li>
  <li><a id="projects" href="projects.php">Projects</a></li>
  <li><a id="about" href="about.php">About Us</a></li>
 </ul>
As you see in above code, we show our title dynamically by using $_SESSION['title']. And I also add a hidden input field above the main navigation ul coed to echo our $_SESSION['menu']. To grab our menu data from this field, I create a javascript function named getMenuVar(). Because we need to use this data in our jquery code to set the css current class in our main menu dynamically.

Below is our footer.php.
<div id="footer">
 Created by <a href="http://www.webinone.net">WebInOne</a>
</div><!-- end of footer-->
</div><!-- end of wrapper-->
</body>
</html>

Below is our style.css.
*{
 margin:0px;
 padding:0px;
}
#wrapper{
 width: 960px;
 margin: 0 auto;
 background-color: #E9E9E9;
}
#header{
 height: 70px;
    padding-top:20px;
}
#main_nav {
 width: 100%;
 height:37px;
 background: #A0A0A4;
 margin: 0;
 padding: 0;
}
#main_nav li {
 list-style: none;
 float: left;
}
#main_nav li:first-child {
 margin-left: 10px;
}
#main_nav a {
 line-height: 100%;
 font-weight: bold;
 color: #fff;
 display: block;
 padding: 10px 15px;
 text-decoration: none;
 text-shadow: 0 -1px 0 rgba(0,0,0,.5);
}
#main_nav a:hover {
 color: #fff;
 background: #808080;
}
.current{
 color: #fff;
 background:#EC7117;
}
#content{
 min-height:100px;
 background:#FFFBF0;
 margin:0px;
}
#footer {
 clear: both;
 color: #ccc;
 height:50px;
 background:#A0A0A4;
}
#footer a {
 color: #fff;
}

Blow is our projects.php. We need to set our $_SESSION['title'] and $_SESSION['menu'].

<?php
 session_start();
 $_SESSION['title']='Projects';
 $_SESSION['menu']='projects';
 include("header.php");
?>
<div id="content">
 <h1>Our projects list</h1>
 Your projects will be here.
</div>
<?php
 include("footer.php");
?>

The latest file we need crate is about.php.

<?php
 session_start();
 $_SESSION['title']='About';
 $_SESSION['menu']='about';
 include("header.php");
?>
<div id="content">
 <h1>About Us</h1>
 About your company.
</div>
<?php
 include("footer.php");
?>

You can download entire source code here.
Download Source Code
Read more ...

Registration system with email verifying in PHP

Wednesday, May 23, 2012
In this tutorial I will show how to write a sign up form with email verification or confirmation in php. If your website use a registration form, you need to use email verification to reduce the spam and to make sure the email supplied belongs to that member.

In this tutorial I create a 7 file like below.

1. index.php - I write a registration form in this file.
2. configdb.php - to connect the database.
3. register.php - In this file, we will do form validation, saving user data to database and sending email to user for confirmation.
4. confirm.php - In this file, we will set the confirmation code to null if the user click the link from his email.
5. login.php - In this file, we will test whether the email and password is correct and confirmation code is null.
6. member.php - In this file, we will test whether the member is or not.
7. logout.php - In this file, we will unset the user session data.

Creating database table

We need to create a user table before writing our script. Import following SQL statement via phpMyAdmin or any other MySQL tool.
CREATE TABLE `user` (
`id` INT( 50 ) NOT NULL AUTO_INCREMENT ,
`username` VARCHAR( 50 ) NOT NULL ,
`email` VARCHAR( 100 ) NOT NULL ,
`password` VARCHAR( 20 ) NOT NULL ,
`com_code` VARCHAR( 255 ) default NULL,
PRIMARY KEY ( `id` )
) ENGINE = InnoDB

index.php

<!DOCTYPE html PUBLIC "-//W3C//DTD XHTML 1.0 Transitional//EN" "http://www.w3.org/TR/xhtml1/DTD/xhtml1-transitional.dtd">
<html xmlns="http://www.w3.org/1999/xhtml">
<head>
<meta http-equiv="Content-Type" content="text/html; charset=utf-8" />
<title>Sing Up</title>
<style>
 label{
  width:100px;
  float:left;
 }
</style>
</head>
<body>
<?php 
 session_start();
 if(isset($_SESSION['error']))
 {
  echo '<p>'.$_SESSION['error']['username'].'</p>';
  echo '<p>'.$_SESSION['error']['email'].'</p>';
  echo '<p>'.$_SESSION['error']['password'].'</p>';
  unset($_SESSION['error']);
 }
?>
<div class="signup_form">
<form action="register.php" method="post" >
 <p>
  <label for="username">User Name:</label>
  <input name="username" type="text" id="username" size="30"/>
 </p>
 <p>
  <label for="email">E-mail:</label>
  <input name="email" type="text" id="email" size="30"/>
 </p>
 <p>
  <label for="password">Password:</label>
  <input name="password" type="password" id="password" size="30 "/>
 </p>
 <p>
  <input name="submit" type="submit" value="Submit"/>
 </p>
</form>
</div>
<p><a href="login.php">Login</a></p>
</body>
</html>
We use the PHP $_SESSIONvariable to show the form validation error that set in the register.php.

configdb.php

<?php
 $mysqli=mysqli_connect('localhost','dbusername','dbpassword','databasename') or die("Database Error");
?>

register.php

I divide this file into two parts to be clear when we discuss. In the first part, you will see the form validation.
<?php
session_start();
include('configdb.php');
if(isset($_POST['submit']))
{
 //whether the username is blank
 if($_POST['username'] == '')
 {
  $_SESSION['error']['username'] = "User Name is required.";
 }
 //whether the email is blank
 if($_POST['email'] == '')
 {
  $_SESSION['error']['email'] = "E-mail is required.";
 }
 else
 {
  //whether the email format is correct
  if(preg_match("/^([a-zA-Z0-9])+([a-zA-Z0-9._-])*@([a-zA-Z0-9_-])+([a-zA-Z0-9._-]+)+$/", $_POST['email']))
  {
   //if it has the correct format whether the email has already exist
   $email= $_POST['email'];
   $sql1 = "SELECT * FROM user WHERE email = '$email'";
   $result1 = mysqli_query($mysqli,$sql1) or die(mysqli_error());
   if (mysqli_num_rows($result1) > 0)
            {
    $_SESSION['error']['email'] = "This Email is already used.";
   }
  }
  else
  {
   //this error will set if the email format is not correct
   $_SESSION['error']['email'] = "Your email is not valid.";
  }
 }
 //whether the password is blank
 if($_POST['password'] == '')
 {
  $_SESSION['error']['password'] = "Password is required.";
 }
Firstly, we test whether the user is blank. And then whether the email is blank; if not, we also test whether the email format is correct. If the email format is correct, we will test whether this email has already exist. And then we will test whether the password is blank.
 //if the error exist, we will go to registration form
 if(isset($_SESSION['error']))
 {
  header("Location: index.php");
  exit;
 }
 else
 {
  $username = $_POST['username'];
  $email = $_POST['email'];
  $password = $_POST['password'];
  $com_code = md5(uniqid(rand()));

  $sql2 = "INSERT INTO user (username, email, password, com_code) VALUES ('$username', '$email', '$password', '$com_code')";
  $result2 = mysqli_query($mysqli,$sql2) or die(mysqli_error());

  if($result2)
  {
   $to = $email;
   $subject = "Confirmation from TutsforWeb to $username";
   $header = "TutsforWeb: Confirmation from TutsforWeb";
   $message = "Please click the link below to verify and activate your account. rn";
   $message .= "http://www.yourname.com/confirm.php?passkey=$com_code";

   $sentmail = mail($to,$subject,$message,$header);

   if($sentmail)
            {
   echo "Your Confirmation link Has Been Sent To Your Email Address.";
   }
   else
         {
    echo "Cannot send Confirmation link to your e-mail address";
   }
  }
 }
}
?>
In this part, we will test whether the error exit; if not, we will add the user data to our database table and will send a mail for email verifying.

confirm.php

<?php
 include('configdb.php');
 $passkey = $_GET['passkey'];
 $sql = "UPDATE user SET com_code=NULL WHERE com_code='$passkey'";
 $result = mysqli_query($mysqli,$sql) or die(mysqli_error());
 if($result)
 {
  echo '<div>Your account is now active. You may now <a href="login.php">Log in</a></div>';
}
 else
 {
  echo "Some error occur.";
 }
?>
This file will active when your click the confirmation link from his/her email. It will update the com_code field from our database table by setting to null. Because when we write our login page, we will also test whether the com_code field is null.

login.php

<!DOCTYPE html PUBLIC "-//W3C//DTD XHTML 1.0 Transitional//EN" "http://www.w3.org/TR/xhtml1/DTD/xhtml1-transitional.dtd">
<html xmlns="http://www.w3.org/1999/xhtml">
<head>
<meta http-equiv="Content-Type" content="text/html; charset=utf-8" />
<title>Login</title>
<style>
 label{
  width:100px;
  float:left;
 }
</style>
</head>
<body>
<?php
 session_start();
 include('configdb.php');
 if(isset($_POST['submit']))
 {
  $email = trim($_POST['email']);
  $password = trim($_POST['password']);
  $query = "SELECT * FROM user WHERE email='$email' AND password='$password' AND com_code IS NULL";
  $result = mysqli_query($mysqli,$query)or die(mysqli_error());
  $num_row = mysqli_num_rows($result);
  $row=mysqli_fetch_array($result);
  if( $num_row ==1 )
         {
   $_SESSION['user_name']=$row['username'];
   header("Location: member.php");
   exit;
  }
  else
         {
   echo 'false';
  }
 }
?>
<div class="login_form">
<form action="login.php" method="post" >
 <p>
  <label for="email">E-mail:</label>
  <input name="email" type="text" id="email" size="30"/>
 </p>
 <p>
  <label for="password">Password:</label>
  <input name="password" type="password" id="password" size="30"/>
 </p>
 <p>
  <input name="submit" type="submit" value="Submit"/>
 </p>
</form>
</div>
</body>
</html>
If the form have been submitted, we will retrieve the data that is equal to the data supplied by user and com_code must also be null. If it is true, we will set the session variable.

member.php

<!DOCTYPE html PUBLIC "-//W3C//DTD XHTML 1.0 Transitional//EN" "http://www.w3.org/TR/xhtml1/DTD/xhtml1-transitional.dtd">
<html xmlns="http://www.w3.org/1999/xhtml">
<head>
<meta http-equiv="Content-Type" content="text/html; charset=utf-8" />
<title>Member page</title>
</head>
<body>
<?php
 session_start();
 if($_SESSION['user_name'] == '')
 {
  header("Location: index.php");
  exit;
 }
 echo "Hi ".$_SESSION['user_name'];
?>
<a href="logout.php">Logout</a>
</body>
</html>
If the user has already logged in, our session variable will not be blank. If it is blank we will go back to index.php or registration form.

logout.php

<?php
 session_start();
 unset($_SESSION['user_name']);
 header('Location: index.php');
?>
Download Source Code
Read more ...

Auto complete text box with PHP, jQuery and MySql

Thursday, May 17, 2012
In this tutorial I want to show you how easy to do a auto complete text box with PHP, jQuery and MySql.

Firstly download the autocomplete jQuery plugin and extract it to your hard drive.
And then create a folder in your localhost. Copy jquery.autocomplete.css and jquery.autocomplete.js file to your project folder. And you will also need jquery.js. Now we can start our project.

Creating database table


We need to create a table in our database before writing our script. I also add some data for this table. Import following SQL statement via phpMyAdmin or any other MySQL tool.

CREATE TABLE `tag` (
  `id` int(20) NOT NULL auto_increment,
  `name` varchar(50) NOT NULL,
  PRIMARY KEY  (`id`)
) ENGINE=MyISAM  DEFAULT CHARSET=latin1 AUTO_INCREMENT=10 ;

INSERT INTO `tag` (`id`, `name`) VALUES
(1, 'php'),
(2, 'php frameword'),
(3, 'php tutorial'),
(4, 'jquery'),
(5, 'ajax'),
(6, 'mysql'),
(7, 'wordpress'),
(8, 'wordpress theme'),
(9, 'xml');

index.php

<!DOCTYPE html PUBLIC "-//W3C//DTD XHTML 1.0 Transitional//EN" "http://www.w3.org/TR/xhtml1/DTD/xhtml1-transitional.dtd">
<html xmlns="http://www.w3.org/1999/xhtml">
<head>
<meta http-equiv="Content-Type" content="text/html; charset=utf-8" />
<title>Auto Complete Input box</title>
<link rel="stylesheet" type="text/css" href="jquery.autocomplete.css" />
<script type="text/javascript" src="jquery.js"></script>
<script type="text/javascript" src="jquery.autocomplete.js"></script>
<script>
 $(document).ready(function(){
  $("#tag").autocomplete("autocomplete.php", {
        selectFirst: true
  });
 });
</script>
</head>
<body>
<label>Tag:</label>
<input name="tag" type="text" id="tag" size="20"/>
</body>
</html>

autocomplete.php

This file is called from our jquery script. This php script is easy to follow.
<?php
 $q=$_GET['q'];
 $my_data=mysql_real_escape_string($q);
 $mysqli=mysqli_connect('localhost','username','password','databasename') or die("Database Error");
 $sql="SELECT name FROM tag WHERE name LIKE '%$my_data%' ORDER BY name";
 $result = mysqli_query($mysqli,$sql) or die(mysqli_error());

 if($result)
 {
  while($row=mysqli_fetch_array($result))
  {
   echo $row['name']."\n";
  }
 }
?>
We have done. Run your project and type in your text box you will see following screenshot.

By the way, I use the old jquery plug in this project. If you want to learn new thing, you can learn here and here. I create this tutorial because it is still useful and easy, although it is too old. I will also write about new jquery ui later.
Download Source Code
Read more ...

Ajax Login form with jQuery and PHP

Tuesday, May 15, 2012
In this tutorial, I will explain you how to create a ajax popup log in form with jquery and php.
Demo
Firstly let's create a folder in your www (for wamp) folder and name as ajax_login.

Crate a blank document in your favourite editor and paste following code in your document. And then save as index.php in your ajax_login folder. I have divided index.php into 2 parts. Below is our body part.

<body>
 <?php session_start(); ?>
 <div id="profile">
  <?php if(isset($_SESSION['user_name'])){
  ?>
   <a href='logout.php' id='logout'>Logout</a>
  <?php }else {?>
   <a id="login_a" href="#">login</a>
  <?php } ?>
 </div>
 <div id="login_form">
 <div class="err" id="add_err"></div>
 <form action="login.php">
  <label>User Name:</label>
  <input type="text" id="user_name" name="user_name" />
  <label>Password:</label>
  <input type="password" id="password" name="password" />
  <label></label><br/>
  <input type="submit" id="login" value="Login" />
  <input type="button" id="cancel_hide" value="Cancel" />
 </form>
 </div>
 <div id="shadow" class="popup"></div>
</body>

In this part, we use the php session variable to check whether the user have already logged in or not. To use session, you need to add session_start() function firstly. If the user has already logged in, we will show the logout. Else we will show login.

And then I create our login_form. We don't want to show this form before the user click the login link. So we need to add the css display:none to our css file for our login_form div.

Following code is our css file. So crate a blank document in your favourite editor and paste the following code. And then save as styles.css in our project folder.

.popup
{
   position: fixed;
   width: 100%;
   opacity: 0.9;
   top:0px;
   min-height:200px;
   height:100%;
   z-index: 100;
   background: #FFFFFF;
   font-size: 20px;
   text-align: center;
   display:none;
}
#login_form
{
 position:absolute;
 width:200px;
 top:100px;
 left:45%;
 background-color:#DDD;
 padding:10px;
 border:1px solid #AAA;
 display:none;
 z-index:101;
 -moz-border-radius: 10px;
 -moz-box-shadow: 0 0 10px #aaa;
 -webkit-border-radius: 10px;
 -webkit-box-shadow: 0 0 10px #aaa;
}

In the index.php head part, first attach the jQuery Library file. And you also need to attach our styles.css. Then write AJAX code into <head> section as following procedure:

<script type="text/javascript">
$(document).ready(function(){
 $("#login_a").click(function(){
  $("#shadow").fadeIn("normal");
  $("#login_form").fadeIn("normal");
  $("#user_name").focus();
 });
 $("#cancel_hide").click(function(){
  $("#login_form").fadeOut("normal");
  $("#shadow").fadeOut();
 });
 $("#login").click(function(){

  username=$("#user_name").val();
  password=$("#password").val();
  $.ajax({
   type: "POST",
   url: "login.php",
   data: "name="+username+"&pwd="+password,
   success: function(html){
    if(html=='true')
    {
     $("#login_form").fadeOut("normal");
     $("#shadow").fadeOut();
     $("#profile").html("<a href='logout.php' id='logout'>Logout</a>");

    }
    else
    {
     $("#add_err").html("Wrong username or password");
    }
   },
   beforeSend:function()
   {
    $("#add_err").html("Loading...")
   }
  });
  return false;
 });
});
</script>

Now let's create a login.php script.

<?php
 session_start();
 $username = $_POST['name'];
 $password = md5($_POST['pwd']);
 $mysqli=mysqli_connect('localhost','username','password','database');
 $query = "SELECT * FROM user WHERE username='$username' AND password='$password'";
 $result = mysqli_query($mysqli,$query)or die(mysqli_error());
 $num_row = mysqli_num_rows($result);
 $row=mysqli_fetch_array($result);
 if( $num_row >=1 ) {
  echo 'true';
  $_SESSION['user_name']=$row['username'];
 }
 else{
 echo 'false';
 }
?>

They are fairly straightforward to understand if you know about php and mysql. But you need to change username, password, database and table name for mysql. If you have a problem, don't hesitate to ask me.
The last thing we need to create is logout.php.

<?php
 session_start();
 unset($_SESSION['user_name']);
 header('Location: index.php');
?>

I think this tutorial will help you.

Download Source Code
Read more ...

Basic PHP Crash Course (part 7)

Saturday, May 12, 2012
In this post, we discuss how to retrieve or select the data from MySQL database to view our pizza order.
To do so we should create admin folder. So that we can prevent the customer from viewing our admin data.

Create a folder named admin in our pizza_shop folder.

Open the new document in your favourite editor or Notepad and type below code.


<html>
<head>
 <title>Amin Pannel</title>
</head>
<body>
<?php
 $con = mysqli_connect('localhost','root','','pizza') or die(mysqli_error());
 $sql="SELECT * FROM `order`";
 $result = mysqli_query($con,$sql) or die(mysqli_error());
 echo "<table width='100%'>";
  echo "<tr bgcolor='#FC0'>".
    "<td width='40%'>Customer Name</td>".
    "<td width='40%'>Address</td>".
    "<td width='20%' align='right'>Quantity</td>".
    "</tr>";
 while($row=mysqli_fetch_array($result)){
  echo "<tr valign='top'>".
    "<td width='40%'>".$row['name']."</td>".
    "<td width='40%'>".$row['address']."</td>".
    "<td width='20%' align='right'>".$row['quantity']."</td>".
    "</tr>";
 }#end of while loop
 echo "</table>";
?>
</body>
</html>

Save above file as index.php in our admin folder. Now if run this address http://localhost/pizza_shop/admin/ from your browser you will see like below.

Explanation

Our sql query is
"SELECT * FROM `order`"
* means all. This query will retrieve all data from our order table of pizza database.


If you familiar with programming, you can follow the code showed above picture. In this code I use while loop to show the order data.

Looping

In every programming, looping is an essential thing. In PHP, there are four kinds of looping. They are while, dowhile, for and foreach. You can use for loop if you know the looping time exactly. You can use dowhile if you want to execute at least once. If you don't know the looping time exactly, you can use while loop. The foreach loop is specially designed for use with arrays.

While Loop

This loop is simplest loop in PHP. It look like if statement. As long as the condition is true, it will execute the block repeatedly.

For our code as long as our order rows exist in our order table of the pizza database, the while loop will show the order rows.
mysqli_fetch_array($result) function will fetch the order table row one by one as an array. If there is no more rows, it will return NULL. When NULL return, while loop will stop.
Read more ...

Basic PHP Crash Course (part 6)

Thursday, April 19, 2012
In the early posts, we do not save the order data. To deliver the user order, we have to save the order data permanently. To do so we will need suitable database server. I will use MySQL.

What is MySQL?

MySQL is a Relational Database Management System. It can store, search, sort and retrieve data efficiently. You can use it freely under the GPL license. You can check more about MySQL in its official website www.mysql.com

What do we need?

In this series, we will learn about MySQL by using phpMyAdmin. It will make you more easy to create a database by using phpMyAdmin than command line because it is a GUI(Graphical User Interfaces) system. To use phpMyAdmin you don't need to install anything if you have installed xampp or wamp as mentioned in this post.
Type this address "http://localhost/phpmyadmin/" in your browser address bar. You will see like below screenshot.


Creating our Database

Click Databases from the menu.


Type in the text box as pizza for the database name and click "Create" button.


You will see your database name in the left menu like below screenshot.


Click your database name. You will see like below screenshot.


Type order in the Name field and type 4 in the Number of columns field like below screenshot. And then click Go button to crate a database table.


Now you need to fill the field name, type etc. like below screenshot.


A database table should have a primary key. So for our order table id field should be the primary key. Select in the Index select box as PRIMARY and set the A_I(AUTO_INCREMENT) check box that will increase automatically our id field number.


Then click Save button.


Now you have created a database table to save your customer order.

PHP and MySQL

It is time to connect the MySQL database by using PHP.
Firstly I want to introduce you to the PHP built-in functions that can connect to the MySQL.

mysqli_connect("hostname","username","password","databasename")

Above function will help you to connect the MySQL database. So you need to know the parameter values.
hostname - Hostname running database server. Default is localhsot. For our xampp or wamp is also localhost.
username - Our xampp or wamp default username is root.
password - Our xampp or wamp default password is blank(no password).
databasename - Our database name is pizza.

You need to add below code to our process.php.

<?php
$con = mysqli_connect('localhost','root','','pizza') or die(mysqli_error());
$sql="INSERT INTO `order` (`name`, `address`, `quantity`) VALUES ('$cus_name', '$address', '$quantity')";
mysqli_query($con,$sql) or die(mysqli_error());
?>


First line will connect to our MySQL sever and it will also return a object which represents the connection to a MySQL Server or FALSE if the connection failed. We need to use this return object in other php function.
In second line, I create a variable of SQL statement that will use in the query function. We can write this SQL statement in the query function directly but we do so for the simplicity. This SQL statement will insert the post data from user order to the order table of our pizza database.
The third line will run our SQL Query.
Our process.php file will be like below.

<?php
 $title = "Pizza Shop: Order Process";
 include('header.php');
 include('sidebar.php');
?>
<div id="content">
<?php
 if(isset($_POST['submit']))
 {
  if( $_POST['cus_name'] != '' && $_POST['quantity'] != '' && $_POST['address'] !='' )
  {
   $cus_name = $_POST['cus_name'];
   $quantity = $_POST['quantity'];
   $address = $_POST['address'];

   $con = mysqli_connect('localhost','root','','pizza') or die(mysqli_error());
   $sql="INSERT INTO `order` (`name`, `address`, `quantity`) VALUES ('$cus_name', '$address', '$quantity')";
   mysqli_query($con,$sql) or die(mysqli_error());
?>
 <p>Thank <?php echo $cus_name; ?> !</p>
 <p>You order <?php echo $quantity; ?> pizza.</p>
 <?php
  $total = $quantity * 10;
 ?>
 <p>It will cost you <?php echo $total; ?> $.</p>
 <p>We will send withing 2 hours to <?php echo $address; ?>.</p>
 <?php
 }
 else
 {
  $_SESSION['error'] = "You need to fill all data";
  header("location: index.php");
 }
 ?>
<?php } ?>
</div><!--end of content -->
<?php
 include('footer.php');
?>
Read more ...

Basic PHP Crash Course (part 5)

Monday, April 9, 2012
This post is part 5 of the Basic PHP Crash Course. If you have never red before this Crash Course, you should read part 1, part 2, part 3 and part 4 first. In this post, we will discuss about our site design or template. For a website it will has header, sidebar, content and footer. So we need to add some html code to our index.php. Following code is our index.php.
<?php session_start(); ?>
<html>
<head>
 <link href="styles.css" rel="stylesheet" type="text/css">
 <title>Pizza Shop: Home</title>
</head>
<body>
 <div id="wrapper">
 <div id="header">
  <h1>Pizza Shop</h1>
 </div><!--end of header -->

 <div id="sidebar">
  <h2>Sidebar</h2>
 </div><!--end of sidebar -->

 <div id="content">
 <?php 
  if($_SESSION['error'] != '')
  {
   echo $_SESSION['error']; 
   $_SESSION['error']='';
  }
 ?>
 <h3>Pizza Shop Order Form</h3>
 <form class="order" action="process.php" method="post">
  <p>
  <label for="cus_name">Customer Name:</label>
  <input type="text" name="cus_name" />
  </p>
  <p>
  <label for="address">Shipping Address:</label>
  <input type="text" name="address" />
  </p>
  <p>
  <label for="quantity">Pizza Quantity:</label>
  <input type="text" name="quantity" />
  </p>
  <p>
  <input type="submit" name="submit" value="Submit Order" />
  </p>
 </form>
 </div><!--end of content -->

 <div id="footer">
  Pizza Shop &copy; 2011
 </div><!--end of footer -->

 </div><!--end of wrapper -->
</body>
</html>
I also create a css file named styles.css like following.
body{
 margin:0px;
 padding:0px;
}
#wrapper{
 width:960px;
 margin:0 auto;
 background-color:#FFC;
}
#header{
 height:90px;
 background-color: #FC0;
}
#header h1{
 color:#FFF;
 padding:10px 0px 0px 10px;
}
#content{
 padding:20px;
 float:left;
}
.order label{
 width:150px;
 float:left;
}
#sidebar{
 width:250px;
 height:300px;
 background-color: #C00;
 float:left;
}
#footer{
 clear:both;
 height:40px;
 background-color:#FC0;
 text-align:center;
}
Now if you run our site, you will see like below.
We have a problem. For our process.php we also need to add the html code that added to our index.php. You can add the needed code to that page. But if you have many files, you need to add every page and if you want to change some code, you will change many files. PHP has a very useful statement include() to solve this problem. It will include and evaluate the specific file. Before we use the include() statement, we will separate the duplicated coed as the separated file. Type the following code and save as header.php.
<?php session_start(); ?>
<html>
<head>
 <link href="styles.css" rel="stylesheet" type="text/css">
 <title>Pizza Shop: Home</title>
</head>
<body>
 <div id="wrapper">

 <div id="header">
  <h1>Pizza Shop</h1>
 </div><!--end of header -->
Type the following code and save as sidebar.php.
<div id="sidebar">
 <h2>Sidebar</h2>
</div><!--end of sidebar -->
Type the following code and save as footer.php.
<div id="footer">
 Pizza Shop &copy; 2011
</div><!--end of footer -->

</div><!--end of wrapper -->
</body>
</html>
Now our index.php will be like below by using include() statement.
<?php
 include('header.php');
 include('sidebar.php');
?>
<div id="content">
<?php 
 if($_SESSION['error'] != '')
 {
  echo $_SESSION['error']; 
  $_SESSION['error']='';
 }
?>
<h3>Pizza Shop Order Form</h3>
<form class="order" action="process.php" method="post">
 <p>
 <label for="cus_name">Customer Name:</label>
 <input type="text" name="cus_name" />
 </p>
 <p>
 <label for="address">Shipping Address:</label>
 <input type="text" name="address" />
 </p>
 <p>
 <label for="quantity">Pizza Quantity:</label>
 <input type="text" name="quantity" />
 </p>
 <p>
 <input type="submit" name="submit" value="Submit Order" />
 </p>
</form>
</div><!--end of content -->
<?php
 include('footer.php');
?>
Our process.php file will be like below.
<?php
 include('header.php');
 include('sidebar.php');
?>
<div id="content">
<?php
 if(isset($_POST['submit']))
 {
  if( $_POST['cus_name'] != '' && $_POST['quantity'] != '' && $_POST['address'] !='' )
  {
   $cus_name = $_POST['cus_name'];
   $quantity = $_POST['quantity'];
   $address = $_POST['address'];
?>
<p>Thank <?php echo $cus_name; ?> !</p>
<p>You order <?php echo $quantity; ?> pizza.</p>
<?php
$total = $quantity * 10;
?>
<p>It will cost you <?php echo $total; ?> $.</p>
<p>We will send withing 2 hours to <?php echo $address; ?>.</p>
<?php
  }
  else
  {
   $_SESSION['error'] = "You need to fill all data";
   header("location: index.php");
  }
?>
<?php } ?>
</div><!--end of content -->
<?php
 include('footer.php');
?>
Our template system is almost finished. Let's think about our page title. It is not flexible. I want to change my title when the page change. To do so we need to create a variable and set our title to this variable before loading the header.php. And then we can use this variable in our header.php. Below is our index.php.
<?php
 $title = "Pizza Shop: Home";
 include('header.php');
 include('sidebar.php');
?>
...
Our process.php file will be like below.
<?php
 $title = "Pizza Shop: Order Process";
 include('header.php');
 include('sidebar.php');
?>
...
Our header.php will be like below.
<?php session_start(); ?>
<html>
<head>
 <link href="styles.css" rel="stylesheet" type="text/css">
 <title><?php echo $title; ?></title>
</head>
<body>
 <div id="wrapper">

 <div id="header">
  <h1>Pizza Shop</h1>
 </div><!--end of header -->
Read more ...

Basic PHP Crash Course (part 4)

Tuesday, April 3, 2012
This post is part 4 of the Basic PHP Crash Course. If you have never red before this Crash Course, you should read part 1, part 2 and part 3 first. In this post we will discuss about PHP Session. It is very useful when you write a web application. Let's think about our pizza shop website. After the user have submitted the order form, our application will call the process.php. Then I want to show the order form again, if the submitted form has the errors. To do so, we have a problem. We cannot know the error data from process.php when we show the order form again. So we must use PHP Session.

What is PHP Session?

Session is a way to store information for the individual user in our server by using session ID. This ID is automatically generated by PHP and store also on the user computer for the lifetime of a session. The content of the session data is store at the server.

Simple Example

<?php session_start(); ?>
<html>
<head>
 <title>Page 1</title>
</head>
<body>
<?php
 $_SESSION['user_name'] = "John";
?>
</body>
</html>
Before we use the session data, we need to load session_start() function. This function will check whether there is already a session. If not, it will create one. Now we can use the superglobal $_SESSION array. So I set the user_name as John. Below is the another page.
<?php session_start(); ?>
<html>
<head>
 <title>Page 2</title>
</head>
<body>
<?php
 echo "Hi ".$_SESSION['user_name'];
?>
</body>
</html>
In this page, we echo the user_name from session data array. If you run the page2, you will see "Hi John". In this way, you can save the data you need for other page. However session data is not permanent storage. For permanent storage, we will use the database like MySql(I will also explain about MySql database later in this series.).

Enhancing our pizza shop website

Now it is time to enhance our pizza shop site. Below is our index.php.
<?php session_start(); ?>
<html>
<head>
 <title>Order Process</title>
</head>
<body>
<?php
 if(isset($_POST['submit']))
 {
  if( $_POST['cus_name'] != '' && $_POST['quantity'] != '' && $_POST['address'] !='' )
  {
   $cus_name = $_POST['cus_name'];
   $quantity = $_POST['quantity'];
   $address = $_POST['address'];
?>
 <p>Thank <?php echo $cus_name; ?> !</p>
 <p>You order <?php echo $quantity; ?> pizza.</p>
<?php
 $total = $quantity * 10;
?>
 <p>It will cost you <?php echo $total; ?> $.</p>
 <p>We will send withing 2 hours to <?php echo $address; ?>.</p>
<?php
 }
 else
 {
  $_SESSION['error'] = "You need to fill all data.";
  header("location: index.php");
 }
?>
<?php } ?>
</body>
</html>
As you know, firstly we need to call the session_start() function to use the session data. If the user submit the form without filling all data, we will set the session error data as "You need to fill all data.". And then redirect our site to index.php by using header() function. This function will tell the browser to load the page that you send as parameter. In our index.php file, we will also start with session_start() function. Then we will retrieve the error data from the session array and will echo before our order form. Below is our index.php.
<?php session_start(); ?>
<html>
<head>
 <title>Pizzs Show: Home</title>
</head>
<body>
<?php 
 if($_SESSION['error'] != '')
 {
  echo $_SESSION['error']; 
  $_SESSION['error']='';
 }
?>
 <h3>Pizza Shop Order Form</h3>
 <form action="process.php" method="post">
 <p>
  <label for="cus_name">Customer Name:</label>
  <input type="text" name="cus_name" />
 </p>
 <p>
  <label for="address">Shipping Address:</label>
  <input type="text" name="address" />
 </p>
 <p>
  <label for="quantity">Pizza Quantity:</label>
  <input type="text" name="quantity" />
 </p>
 <p>
  <input type="submit" name="submit" value="Submit Order" />
 </p>
 </form>
</body>
</html>
Read more ...

Basic PHP Crash Course (part 3)

Thursday, March 29, 2012
This post is part 3 of the Basic PHP Crash Course. If you have never red before this Crash Course, you should read part 1 and part 2 first. Before enhancing our site, I want to explain you about the function.

What is a function?

A function is a block of code that has a name. It is not executed when we load the page. We need to call its name when we need to execute that block of code. And then we can call any time whenever we need it. If you have some code that need to use many time, you should use as the function. The function name can start with a letter or underscore (not a number) To understand the idea of function, we need to create our own simple function.

Simple Function

Let's start with the hello world function.
<?php
  function hello()
  {
   echo "Hello World!";
  }
hello();
?>

Function with parameter

Parameter is a variable that we send to our function to use withing our function.
<?php
  function hello($name)
  {
   echo "Hello ".$name;
  }
hello("Jack");
?>

Function with return value

Return value is a variable that return from our function. Sometime we need a return value
<?php
function add($a,$b)
{
 $result = $a + $b;
 return $result;
}
$total = add(5,3);
echo $total;
echo add(3,5);
?>
We can use the return value like above example and like int our web site.

Enhancing our site

There is no need to change in our index.php. For our process.php, we need to test whether the user fill the form data or not. To determine whether a variable is set, we will use isset() function. In PHP, there are many built-in functions. I create a tutorial about this here. Following is our new process.php
<html>
<head>
 <title>Order Process</title>
</head>
<body>
<?php
if($_POST['submit']=='Submit Order')
{
 if( isset($_POST['cus_name']) && isset($_POST['quantity']) && isset($_POST['address']) )
 {
  $cus_name = $_POST['cus_name'];
  $quantity = $_POST['quantity'];
  $address = $_POST['address'];
 ?>
 <p>Thank <?php echo $cus_name; ?> !</p>
 <p>You order <?php echo $quantity; ?> pizza.</p>
 <?php
  $total = $quantity * 10;
 ?>
 <p>It will cost you <?php echo $total; ?> $.</p>
 <p>We will send withing 2 hours to <?php echo $address; ?>.</p>
 <?php
    } 
 else
  echo "You need to fill all data";
 ?> 
 <?php } ?>
</body>
</html>

Explanation

Let's talk about isset() function. We will pass at least one parameter and it will return boolean true or false. It will return TRUE if var exists; FALSE otherwise.

Logical Operators

If you need to combine the results of logical conditions, you must be use logical operators. Following table is PHP logical operators.
!NOT
&&AND
||OR
andAND
orOR
xorXOR
Read more ...

Basic PHP Crash Course (part 2)

Sunday, March 25, 2012
This post is part 2 of the Basic PHP Crash Course. In part 1, we discuss about the html form, php variable, post method and some operator. In this part, we will discuss about php if() statement and comparison operators by enhancing our pizza shop site.

We created two file index.php and process.php in part 1.
There is no need to change in our index.php.

For our process.php,
we should know whether the form is submitted or not before we process the form. If the user run this url "http://localhost/pizza_shop/process.php" directly, user can get error.
So we have to change in our process.php. Our new process.php is as follow.


<html>
<head>
 <title>Order Process</title>
</head>
<body>
 <?php
 if($_POST['submit']=='Submit Order')
 {
  $cus_name = $_POST['cus_name'];
  $quantity = $_POST['quantity'];
  $address = $_POST['address'];
 ?>
 <p>Thank <?php echo $cus_name; ?> !</p>
 <p>You order <?php echo $quantity; ?> pizza.</p>
 <?php
  $total = $quantity * 10;
 ?>
 <p>It will cost you <?php echo $total; ?> $.</p>
 <p>We will send withing 2 hours to <?php echo $address; ?>.</p>
 <?php } ?>
</body>
</html>

Explanation

Sometime we need to do some action depend on other condition. For this saturation we will use if statement. Below is the idea of the "if" conditional statement.

if

if (this condition is true)
this action will be execute

if...else

if (condition one is true)
action one will be execute
else
action two will be execute

if...elseif...else

if (condition one is true)
action one will be execute
elseif (condition two is true)
action two will be execute
.
.
.
else
last action will be execute

Examples

Below is syntax of the "if" conditional statements.

if


<?php
 $a = 5;
 $b = 3;
 if($a > $b)
  echo "a is greater than b";
?>

if...else


<?php
 $a = 5;
 $b = 7;
 if($a > $b)
  echo "a is greater than b";
 else
  echo "a is less than b"; 
?>

if...elseif...else


<?php
 $a = 5;
 $b = 5;
 if($a > $b)
  echo "a is greater than b";
 elseif($a < $b)
  echo "a is less than b"; 
 else
  echo "a is equal to b";
?>

Note: If your action code is more than one statement, you must use the curly braces {}.

Comparison Operators

PHP has the following comparison operators.
==is equal to
===is identical
!=is not equal
!==is not identical
<>is not equal
>greater than
<less than
>=greater than or equal
<=less than or equal
Read more ...

Basic PHP Crash Course (part 1)

Thursday, March 22, 2012
I want to create a tutorial serie for the PHP beginner. So I have been writing this Crash Course. I think it is more interesting to learn PHP by creating the real website.

What do you need to know to learn this PHP Crash Course?

You have already know about HTML and CSS. It is more good if you know about JavaScript.

Have you ever run php script in localhost? If you haven't, read this tutorial first.

I believe that you have already known about the HTML form.

Let's start with very little web application. Assuming that we sell the pizza. So create a folder below your c:xampphtdocs folder and name it pizza_shop. And then open a new document in your favourite editor. Type below code in your new document and save as index.php in your pizza_shop folder.

<html>
<head>
 <title>Pizzs Show: Home</title>
</head>
<body>
 <h3>Pizza Shop Order Form</h3>
 <form action="process.php" method="post">
  <p>
   <label for="cus_name">Customer Name:</label>
   <input type="text" name="cus_name" />
  </p>
  <p>
   <label for="address">Shipping Address:</label>
   <input type="text" name="address" />
  </p>
  <p>
   <label for="quantity">Pizza Quantity:</label>
   <input type="text" name="quantity" />
  </p>
  <p>
   <input type="submit" name="submit" value="Submit Order" />
  </p>
 </form>
</body>
</html>

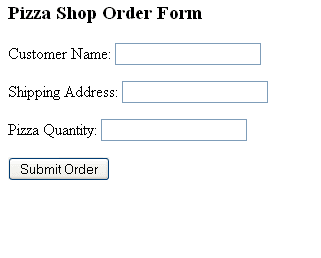
Run your browser and check this address http://localhost/pizza_shop
You will see like below screenshot.


Why? When you run your site, index.php will be called as default.

When the customer fills and submits the form, process.php page will be called because you set in the form action attribute to "process.php". The process.php file will get the form variables by using POST method because you set in from method attribute to "post". I will also explain about post method later in this post.

Now we need to create process.php. Type below code in your new document and save as process.php in your pizza_shop folder.

<html>
 <head>
  <title>Order Process</title>
 </head>
<body>
 <?php
  $cus_name = $_POST['cus_name'];
  $quantity = $_POST['quantity'];
  $address = $_POST['address'];
 ?>
 <p>Thank <?php echo $cus_name; ?> !</p>
 <p>You order <?php echo $quantity; ?> pizza.</p>
 <?php
  $total = $quantity * 10;
 ?>
 <p>It will cost you <?php echo $total; ?> $.</p>
 <p>We will send withing 2 hours to <?php echo $address; ?>.</p>
</body>
</html>

Explanation


Variable

Let me introduce you to PHP variable to understand above code.

Variable is look like a box. You can store values like string, number, object etc. And then we can reuse this variable through our code.

Have you noticed that every variable start with dollar sign($) in our site?

All variable name must start with dollar sign($) and can contain alphabetic character, under score and number. But it cannot start with number. Check below example.

$string = "Hello World!";  //Valid
$string2 = 'Hi everyone!'; //Valid

$_number = 3;   //Valid
$number = 2.2;  //valid

$flag = true;   //valid

$1number = 5;       //Invalid
$2string = "Second String"; //Invalid

The first two are assigned string. If you want to assign string value you must be use double quotes or single quotes.

The second two are integer and float numbers.

The third one is boolean and you don't need double quotes or single quotes to assign boolean value.

Last two is invalid because they start with the number.

You don't need to declare the variable type before use like C. In PHP, the type of variable is determined by the value assigned to it.
Variable names are case sensitive.

POST

There are two types to access the form variables from one page to another. They are POST and GET that you set in your html form method. They have their own usefulness. In this post I will tell you only about POST.

$_POST is the superglobal variable which contain all POST data. It is an associated array of variables passed to the current script via the HTTP POST method. They are automatically set for you by PHP.
You can access the each form field as PHP variable whose name relates to the name of the form.

Operator

We also use two operators in our pizza site. They are assignment operator equal(=) and multiplication (*).
There are many operators in PHP like other languages. I want to introduce you some operators for this post.

Assignment(=) e.g $number = 1;

Mathematical Operators
Addition (+) e.g $total = 1+1;
Subtraction (-) e.g $result = 2-1;
Division (/) e.g $result = 5/2; //result will be 2.5
Modulus (%) e.g $result = 5%2; //result will be 1
Read more ...

Creating menu from database data

Saturday, February 11, 2012
This post will walk you through a detailed tutorial on how to make a vertical menu system from our categories that stored in database. In this script, when the user add the new categories dynamically, the system will render the added categories as the menu items automatically. Below is our final result screenshot.

Firstly, we need to create a database. I named it as catmenu and below is our categories table for our menu system.
CREATE TABLE IF NOT EXISTS `categories`
`cat_id` int(5) NOT NULL AUTO_INCREMENT,
`cat_name` varchar(255) NOT NULL,
`parent_id` int(5) NOT NULL,
PRIMARY KEY (`cat_id`)
) ENGINE=InnoDB  DEFAULT CHARSET=latin1;
The next thing we need to do is to create a form to add our menu data from our site dynamically.
Open new document and type below code and save as category.php
<!DOCTYPE html>
<html>
<head>
 <title>Adding category for menu</title>
</head>
<body>
<?php
 if(isset($_POST['submit']))
 {
  $parent_name=addslashes($_POST['parent_name']);
  $cat_name=addslashes($_POST['cat_name']);
  mysqli=mysqli_connect('localhost','root','','catmenu');
  $sql="INSERT INTO categories(cat_name, parent_id) VALUES ('$cat_name', '$parent_name')";
  $result=mysqli_query($mysqli,$sql);
  if($result){
   header("location: category.php");
   exit; 
  }
 }
?> 
<form class="cat_form" id="cat_form" method="post" action="category.php" >
 <p>
  <label>Parent:</label>
  <?php
   $mysqli=mysqli_connect('localhost','root','','catmenu');
   $sql="SELECT cat_id,cat_name FROM categories WHERE parent_id=0";
   $result=mysqli_query($mysqli,$sql);
   echo "<select name='parent_name' id='parent_name' length='15'>";
   echo "<option  value='0'>Root</option>";
   while($row=mysqli_fetch_array($result)){
     $cat_id=$row['cat_id'];
     $cat_name=$row['cat_name'];
     echo "<option value=".$cat_id." >".$cat_name."</option>";
   }
   echo "</select>";
  ?>
 </p>
 <p>
  <label>Category Name:</label>
  <input type="text" id="cat_name" name="cat_name" />
 </p>
 <p>
  <input type="submit" value="Add" name="submit" />
 </p>
</form>
</body>
</html>
If you load this script in your browser, you will see like below. Type the category name for our menu in the text box.

I type it as Tutorials and click Add button. You will see this form again. Now you can choose your parent category from Parent drop down list if you want to add as a sub menu like below.

I also add some menu data for my site and now it is time to write a index.php for our site. Below is our index.php.
<!DOCTYPE html>
<html>
  <head>
   <title>Vertical menu</title>
  <style type="text/css">
  #navigation {
   width:200px; 
   float:left; 
   margin-top:5px;
  }
  #navigation ul{
   margin:0px; 
   padding:0px; 
   background-color: #CCC;
  }
  #navigation ul li {
     height:25px;
   line-height:25px;
   list-style:none;
   padding-left:10px;
   border-top:#fff solid;
   border-bottom:#fff solid;
   border-width:1px;
   cursor:pointer;
  }
  #navigation ul li a{
   text-decoration:none;
   color: #fff;
  }
  #navigation ul li:hover{
   background-color: #39F; 
   position:relative;
  }
  #navigation ul ul {
   display:none;
   position:absolute;
   left:150px;
   top:0px;
   border:#fff solid;
   border-width:1px;
   background-color: #CCC;
  } 
  #navigation ul li:hover ul {
   display:block;
  }
  #navigation ul ul li {
   border:none; 
   width:150px; 
   float:left; 
   display:inline;
  }
  #navigation ul ul li:hover {
   border:none;
  }
  </style>
  </head>
  <body>
  <div id="navigation">
  <ul>
  <?php
   $mysqli=mysqli_connect('localhost','root','','catmenu');
   $sql="SELECT * FROM categories WHERE parent_id = 0";
   $result=mysqli_query($mysqli,$sql) or die(mysqli_error());
   while($row=mysqli_fetch_array($result)){
    $cat_id=$row['cat_id'];
    $cat_name=$row['cat_name'];
    echo "<li>
    <a href='index.php?cat=$cat_id'>".$cat_name."</a>";
    echo "<ul>";
    $sql2="SELECT * FROM categories WHERE parent_id=$cat_id and cat_id<>0";
    $result2=mysqli_query($mysqli,$sql2) or die(mysqli_error());

    while($row=mysqli_fetch_array($result2)){
     $sub_cat_id=$row['cat_id'];
     $sub_cat_name=$row['cat_name'];
     echo "<li><a href='index.php?cat=$sub_cat_id'>".$sub_cat_name."</a></li>";
    }
    echo "</ul>";
    echo "</li>";
  
   }
  ?>
  </ul>
  </div>
  </body>
</html>
If you run this site you will see like below but can change according our menu items that added in the above form.
Read more ...

PHP tag cloud

Tuesday, February 7, 2012
In this tag cloud, I use only PHP and css. I don't want to explain what is tag cloud because I think you will be familiar with it and you will know how it is useful. Let's talk about how to make a tag cloud.

We need some information from our database. So you need to create a database by using below sql script.
CREATE TABLE IF NOT EXISTS `tags` (
  `id` bigint(50) NOT NULL AUTO_INCREMENT,
  `tag_name` text NOT NULL,
  `frequency` int(50) NOT NULL,
  PRIMARY KEY (`id`)
) ENGINE=InnoDB  DEFAULT CHARSET=latin1 AUTO_INCREMENT=14 ;
--
-- Dumping data for table `tags`
--
INSERT INTO `tags` (`id`, `tag_name`, `frequency`) VALUES
  (1, 'PHP', 100),
  (2, 'ASP', 10),
  (3, 'jQuery', 50),
  (4, 'Codeigniter', 100),
  (5, 'MySql', 50),
  (6, 'Google', 5),
  (7, 'Javascript', 7),
  (8, 'hardware', 4),
  (9, 'Design', 80),
  (10, 'Ajax', 30),
  (11, 'wordpress', 10),
  (12, 'css3', 30),
  (13, 'mobile', 15);


Below is our script that generate tag cloud. How simple it is.
<!DOCTYPE html>
<html>
<head>
<title>Tags cloud</title>
<style type="text/css">
.tags_container{width:300px;padding:10px 10px;}
.tags ul{padding:5px 5px;}
.tags li{margin:0;padding:0;list-style:none;display:inline;}
.tags li a{text-decoration:none;padding:0 2px;}
.tags li a:hover{text-decoration:underline;} 

.tag1 a{font-size:12px; color: #9c639c;}
.tag2 a{font-size:14px; color: #cece31;}
.tag3 a{font-size:16px; color: #9c9c9c;}
.tag4 a{font-size:18px; color: #31ce31;}
.tag5 a{font-size:20px; color: #6363ad;}
.tag6 a{font-size:22px; color: #ce6300;}
.tag7 a{font-size:24px; color: #9c3100;}
</style>
</head>
<body>
<?php 
 $con = mysqli_connect("localhost", "root", "","tagcloud");
 $query = "SELECT MAX(frequency) as num FROM tags";
 $result = mysqli_query($con,$query);
 $max = mysqli_fetch_array($result);
 if($max['num'] <10) $max['num'] = 10;
?>
<div id="content">
<div class="tags_container">
 <ul class="tags">
 <?php
  $factor = $max['num']/7;
  $query = "SELECT * FROM tags";
  $result = mysqli_query($con,$query);
  while($row=mysqli_fetch_array($result)){
   for($i=0; $i<=6; $i++)
   {
    $start = $factor * $i;
    $end = $start + $factor;
    if($row['frequency'] > $start && $row['frequency'] <= $end)
    {
     $tag_number = $i+1;
    }
   }
 ?>
  <li class="tag<?php echo $tag_number; ?>">
   <a href="#">
    <?php echo $row['tag_name']; ?>
   </a>
  </li>
 <?php
  }
 ?>
 </ul>
</div>
</div>
</body>
</html>
Below is the screenshot of our tag cloud.

In this script you can easily control your tag cloud appearance. You can change your tag color and font size by changing some css code.

You can also change the numbers of style that you want to use in your tag cloud by changing when you find the factor. If you want to use 10 tag style, you will divide by 10 and in for loop change 6 to 9.

If you want to order your tags according to the frequency, only thing you need to do is changing query string like below.
$query = "SELECT * FROM tags order by frequency desc";
Read more ...

PHP installation script

Thursday, February 2, 2012
In this post, we will discuss about installation script for our web site or web application. I divided into four functions for four steps.

Before we do the first step, we need some code to call our functions according to the url.
Open new document in your favourite editor and type below code and save as install.php

<!DOCTYPE html>
<html>
<head>
<title>Installation Script</title>
</head>
<?php
$step = (isset($_GET['step']) && $_GET['step'] != '') ? $_GET['step'] : '';
switch($step){
  case '1':
  step_1();
  break;
  case '2':
  step_2();
  break;
  case '3':
  step_3();
  break;
  case '4':
  step_4();
  break;
  default:
  step_1();
}
?>
<body>

Step 1

Step one is for license agreement. If the user agree to our license, we will call the step two. Type below code, in our install.php.

<?php
function step_1(){ 
 if($_SERVER['REQUEST_METHOD'] == 'POST' && isset($_POST['agree'])){
  header('Location: install.php?step=2');
  exit;
 }
 if($_SERVER['REQUEST_METHOD'] == 'POST' && !isset($_POST['agree'])){
  echo "You must agree to the license.";
 }
?>
 <p>Our LICENSE will go here.</p>
 <form action="install.php?step=1" method="post">
 <p>
  I agree to the license
  <input type="checkbox" name="agree" />
 </p>
  <input type="submit" value="Continue" />
 </form>
<?php 
}
You need to do some design for your site. I don't do anything for that.

Step 2

In step two, we will test the requirement for our site or application.

function step_2(){
  if($_SERVER['REQUEST_METHOD'] == 'POST' && $_POST['pre_error'] ==''){
   header('Location: install.php?step=3');
   exit;
  }
  if($_SERVER['REQUEST_METHOD'] == 'POST' && $_POST['pre_error'] != '')
   echo $_POST['pre_error'];
      
  if (phpversion() < '5.0') {
   $pre_error = 'You need to use PHP5 or above for our site!<br />';
  }
  if (ini_get('session.auto_start')) {
   $pre_error .= 'Our site will not work with session.auto_start enabled!<br />';
  }
  if (!extension_loaded('mysql')) {
   $pre_error .= 'MySQL extension needs to be loaded for our site to work!<br />';
  }
  if (!extension_loaded('gd')) {
   $pre_error .= 'GD extension needs to be loaded for our site to work!<br />';
  }
  if (!is_writable('config.php')) {
   $pre_error .= 'config.php needs to be writable for our site to be installed!';
  }
  ?>
  <table width="100%">
  <tr>
   <td>PHP Version:</td>
   <td><?php echo phpversion(); ?></td>
   <td>5.0+</td>
   <td><?php echo (phpversion() >= '5.0') ? 'Ok' : 'Not Ok'; ?></td>
  </tr>
  <tr>
   <td>Session Auto Start:</td>
   <td><?php echo (ini_get('session_auto_start')) ? 'On' : 'Off'; ?></td>
   <td>Off</td>
   <td><?php echo (!ini_get('session_auto_start')) ? 'Ok' : 'Not Ok'; ?></td>
  </tr>
  <tr>
   <td>MySQL:</td>
   <td><?php echo extension_loaded('mysql') ? 'On' : 'Off'; ?></td>
   <td>On</td>
   <td><?php echo extension_loaded('mysql') ? 'Ok' : 'Not Ok'; ?></td>
  </tr>
  <tr>
   <td>GD:</td>
   <td><?php echo extension_loaded('gd') ? 'On' : 'Off'; ?></td>
   <td>On</td>
   <td><?php echo extension_loaded('gd') ? 'Ok' : 'Not Ok'; ?></td>
  </tr>
  <tr>
   <td>config.php</td>
   <td><?php echo is_writable('config.php') ? 'Writable' : 'Unwritable'; ?></td>
   <td>Writable</td>
   <td><?php echo is_writable('config.php') ? 'Ok' : 'Not Ok'; ?></td>
  </tr>
  </table>
  <form action="install.php?step=2" method="post">
   <input type="hidden" name="pre_error" id="pre_error" value="<?php echo $pre_error;?>" />
   <input type="submit" name="continue" value="Continue" />
  </form>
<?php
}
I add some requirement as the sample. You should change according to your requirement.

Step 3

In step three, we need to create the config file and database for our site. And we will also save admin name and password in our database. To do so, our site users will fill their database information and admin information. You can also add other information that you need for your site.
function step_3(){
  if (isset($_POST['submit']) && $_POST['submit']=="Install!") {
   $database_host=isset($_POST['database_host'])?$_POST['database_host']:"";
   $database_name=isset($_POST['database_name'])?$_POST['database_name']:"";
   $database_username=isset($_POST['database_username'])?$_POST['database_username']:"";
   $database_password=isset($_POST['database_password'])?$_POST['database_password']:"";
   $admin_name=isset($_POST['admin_name'])?$_POST['admin_name']:"";
   $admin_password=isset($_POST['admin_password'])?$_POST['admin_password']:"";
  
  if (empty($admin_name) || empty($admin_password) || empty($database_host) || empty($database_username) || empty($database_name)) {
   echo "All fields are required! Please re-enter.<br />";
  } else {
   $connection = mysql_connect($database_host, $database_username, $database_password);
   mysql_select_db($database_name, $connection);
  
   $file ='data.sql';
   if ($sql = file($file)) {
   $query = '';
   foreach($sql as $line) {
    $tsl = trim($line);
   if (($sql != '') && (substr($tsl, 0, 2) != "--") && (substr($tsl, 0, 1) != '#')) {
   $query .= $line;
  
   if (preg_match('/;\s*$/', $line)) {
  
    mysql_query($query, $connection);
    $err = mysql_error();
    if (!empty($err))
      break;
   $query = '';
   }
   }
   }
   @mysql_query("INSERT INTO admin SET admin_name='".$admin_name."', admin_password = md5('" . $admin_password . "')");
   mysql_close($connection);
   }
   $f=fopen("config.php","w");
   $database_inf="<?php
     define('DATABASE_HOST', '".$database_host."');
     define('DATABASE_NAME', '".$database_name."');
     define('DATABASE_USERNAME', '".$database_username."');
     define('DATABASE_PASSWORD', '".$database_password."');
     define('ADMIN_NAME', '".$admin_name."');
     define('ADMIN_PASSWORD', '".$admin_password."');
     ?>";
  if (fwrite($f,$database_inf)>0){
   fclose($f);
  }
  header("Location: install.php?step=4");
  }
  }
?>
  <form method="post" action="install.php?step=3">
  <p>
   <input type="text" name="database_host" value='localhost' size="30">
   <label for="database_host">Database Host</label>
 </p>
 <p>
   <input type="text" name="database_name" size="30" value="<?php echo $database_name; ?>">
   <label for="database_name">Database Name</label>
 </p>
 <p>
   <input type="text" name="database_username" size="30" value="<?php echo $database_username; ?>">
   <label for="database_username">Database Username</label>
 </p>
 <p>
   <input type="text" name="database_password" size="30" value="<?php echo $database_password; ?>">
   <label for="database_password">Database Password</label>
  </p>
  <br/>
  <p>
   <input type="text" name="admin_name" size="30" value="<?php echo $username; ?>">
   <label for="username">Admin Login</label>
 </p>
 <p>
   <input name="admin_password" type="text" size="30" maxlength="15" value="<?php echo $password; ?>">
   <label for="password">Admin Password</label>
  </p>
 <p>
   <input type="submit" name="submit" value="Install!">
  </p>
  </form>
<?php
}
According to our script, we need to crate a sql file. Open your Notepad and type blow sql script and save as data.sql in your project folder.
I create only admin table for the simplicity.
CREATE TABLE IF NOT EXISTS `admin` (
`admin_id` int(11) NOT NULL AUTO_INCREMENT,
`admin_name` varchar(50) NOT NULL,
`admin_password` varchar(50) NOT NULL,
PRIMARY KEY (`admin_id`)
) ENGINE=InnoDB DEFAULT CHARSET=latin1 AUTO_INCREMENT=1 ;

The next thing we need to do is to create a config.php file in your project folder. You don't need to do anything for this file save as blank.

Step 4

In this function, I only write tow link for our site home page and for admin page.
function step_4(){
?>
 <p><a href="http://localhost/installsample/">Site home page</a></p>
 <p><a href="http://localhost/installsample/admin">Admin page</a></p>
<?php 
}
?>

index.php

Below is our index.php file.
<!DOCTYPE html>
<html>
<head>
<title>Installation Script</title>
</head>
<body>
<?php
  require 'config.php';
  if (!defined('DATABASE_NAME')) {
   header('Location: install.php');
   exit;
  }
?>
  <p>This is our site.</p>
</body>
</html>
Below is some screenshot of our scritp.

Read more ...