Pages

User friendly date with Codeigniter and MySQL

Tuesday, March 6, 2012
When we deal with the date in Codeigniter and MySQL, there is a little problem that MySQL accepts dates only in the ISO-recommended format YYYY-MM-DD. I want users to be able to enter and show dates in a more familiar format.

At here if you use a text box to enter the date, user can do many mistake. So the best way to handle the input of dates is with separate fields using HTML <select> elements or combo boxes. Let's start our project.

Requirement

CodeIgniter

Step 1: Configuration

Open application/config/database.php, and change the following database configuration to fit your mysql configuration.

$config['hostname'] = “localhost”;

$config['username'] = “myusername”;

$config['password'] = “mypassword”;

$config['database'] = “mydatabase”;

$config['dbdriver'] = “mysql”;

Then open application/config/config.php

$config['base_url'] = ‘http://localhost/ci_date’;

Open application/config/autoload.php

$autoload['libraries'] = array('database’);

and

$autoload['helper'] = array(‘url’,'form’);

Open application/config/routes.php, change default controller to user controller as we’ll create later on this tutorial.

$route['default_controller'] = ‘home’;

Creating Database table

We need to create a table in our database. Import following SQL statement via phpMyAdmin or any other MySQL tool.

CREATE TABLE `user` (
  `id` int(20) NOT NULL auto_increment,
  `name` varchar(50) NOT NULL,
  `dob` date NOT NULL,
  PRIMARY KEY  (`id`)
) ENGINE=InnoDB  DEFAULT CHARSET=latin1 AUTO_INCREMENT=1 ;

Designing our date input view files

Now let's create our design file. Create a blank document in the views folder (application -> views) and name it home_view.php, in the document add all the following code.

<!DOCTYPE html>
<html lang="en">
<head>
 <meta http-equiv="Content-Type" content="text/html; charset=utf-8">
 <title><?php echo (isset($title)) ? $title : "My CI Site" ?> </title>
 <link rel="stylesheet" type="text/css" href="<?php echo base_url();?>/css/style.css" />
</head>
<body>
 <div id="wrapper">
 <div id="content">
 <?php $this->load->helper('dob'); ?>
 <div class="reg_form">
 <?php echo validation_errors('<p class="error">'); ?>
 <?php echo form_open("home/add_data"); ?>
  <p>
   <label for="user_name">User Name:</label>
   <input type="text" id="user_name" name="user_name" value="" />
  </p>
  <p>
   <label>Birthday:</label>
   <select name="month"><option value="0">Month:</option><?php echo generate_options(1,12,'callback_month')?></select>
   <select name="day"><option value="0">Day:</option><?php echo generate_options(1,31)?></select>
   <select name="year"><option value="0">Year:</option><?php echo generate_options(2011,1900)?></select>
  </p>
  <p>
   <input type="submit" class="greenButton" value="Submit" />
  </p>
 <?php echo form_close(); ?>
</div><!--<div class="reg_form">-->
</div><!--<div id="content">-->
<div id="footer">
 &copy; 2011 <a href="http://tutsforweb.blogspot.com/">TutsforWeb</a> All Rights Reserved.
</div><!-- <div class="footer">-->
</div><!--<div id="wrapper">-->
</body>
</html>

In this file, you will notice that dob helper. It is not CI built in helper. This helper is created by learning this tutorial.

Our birthday field will be look like below:

Creating dob_helper

Following code is our dob_helper.php. Create a blank document in the helpers floder (application -> helpers) and name it dob_helper.php, in the document add all the following code.

<?php
if ( ! defined('BASEPATH')) exit('No direct script access allowed');
if ( ! function_exists('generate_options'))
{
 function generate_options($from,$to,$callback=false)
 {
  $reverse=false;
  if($from>$to)
  {
   $tmp=$from;
   $from=$to;
   $to=$tmp;
   $reverse=true;
  }
  $return_string=array();
  for($i=$from;$i<=$to;$i++)
  {
   $return_string[]='
   <option value="'.$i.'">'.($callback?$callback($i):$i).'</option>
   ';
  }
  if($reverse)
  {
   $return_string=array_reverse($return_string);
  }
  return join('',$return_string);
 }
}
if ( ! function_exists('callback_month'))
{
 function callback_month($month)
 {
  return date('F',mktime(0,0,0,$month,1));
 }
}
if ( ! function_exists('format_date'))
{
 function format_date($date)
 {
  $parts = explode('-',$date);
  return date('F j, Y',mktime(0,0,0,$parts[1],$parts[2],$parts[0]));
 }
}
?>

In our helper, it has three functions generate_options(), callback_month() and format_date(). We used the generate_options() and callback_month() in our html select element to fill the data. The format_date() function will be used when we display the date to the user.

Check the input date in the Controller

Create a blank document in the controllers folder (application -> controllers) and name it home.php, in the document add all the following code.

<?php if ( ! defined('BASEPATH')) exit('No direct script access allowed');
class Home extends CI_Controller{
 public function __construct(){
  parent::__construct();
  $this->load->model('home_model');
 }
 public function index()
 {
  $this->load->view('home_view');
 }
 public function add_data()
 {
  $_POST['dob'] = $_POST['year'].'-'.$_POST['month'].'-'.$_POST['day'];
  $this->load->library('form_validation');
  // field name, error message, validation rules
  $this->form_validation->set_rules('user_name', 'User Name', 'trim|required|min_length[4]|xss_clean');
  $this->form_validation->set_rules('dob', 'Date of Birth', 'callback_date_check');
  if ($this->form_validation->run() == FALSE)
  {
   $this->load->view('home_view');
  }
  else
  {
   $this->home_model->save_data();
   $this->show();
  }
 }
 public function date_check()
 {
  if(checkdate($_POST['month'],$_POST['day'],$_POST['year']))
  {
   return TRUE;
  }
  else
  {
   $this->form_validation->set_message('date_check', 'Correct you Date of Birth.');
   return FALSE;
  }
 }
 public function show()
 {
  $this->load->model('home_model');
  $data['query']=$this->home_model->get_all();
  $this->load->view('dateshow_view',$data);
 }
}
?>

In our add_data() function, firstly we set the $_POST['dob'] from our three html select boxes by concatenating '-' between them. Now our dob post data is ready to add to the MySQL database. There's just one problem with this: someone might enter an invalid date, such as February 31 or September 31. So, it's a good idea to use the PHP checkdate() function to make sure the date is valid.

So when we set the form validation rule for our dob (Date of Birth) field, we use the callback function as date_check(). You can easily follow our date_check() function I think.

Showing our user friendly date

Let's create our dateshow_view.php to test the format_date() function from our dob_helper. Create a blank document in the views folder (application -> views) and name it dateshow_view.php, in the document add all the following code.

<!DOCTYPE html>
<html lang="en">
<head>
 <meta http-equiv="Content-Type" content="text/html; charset=utf-8">
 <title><?php echo (isset($title)) ? $title : "My CI Site" ?> </title>
 <link rel="stylesheet" type="text/css" href="<?php echo base_url();?>/css/style.css" />
</head>
<body>
<div id="wrapper">
<div id="content">
 <?php $this->load->helper('dob'); ?>
 <?php    foreach($query as $row){?>
  <p>
  <?php
   echo format_date($row->dob);
  ?>
  </p>
 <?php }?>
</div>
</div>
</body>
</html>

It will display our date as below picture.


Creating Model

Our model is very simple. Create a blank document in the models folder (application -> models) and name it home_model.php, in the document add all the following code.

<?php if ( ! defined('BASEPATH')) exit('No direct script access allowed');
class Home_model extends CI_Model {
 public function __construct()
 {
  parent::__construct();
 }
 public function save_data()
 {
  $data=array(
   'name'=>$this->input->post('user_name'),
   'dob'=>$this->input->post('dob')
  );
  $this->db->insert('user',$data);
 }
 function get_all()
 {
  $query=$this->db->get('user');
  return $query->result();
 }
}

Designing with CSS

Create a folder named css in your root directory and save following code as a sytle.css.

@charset "utf-8";
/* CSS Document */
body{
 background-color:#FFF;
 font-family:Monaco,Consolas,'Lucida Grande','Lucida Console';
 font-size:16px;
 text-shadow:rgba(0,0,0,0.01) 0 0 0;
}
#wrapper{
 width:960px;
 margin:0 auto;
}
#content{
 width:960px;
 margin:5px;
 float:left;
}
/************************************************/
.reg_form{
 width:460px;
 padding:20px;
 margin:0 auto;
 border:3px solid #DFDFDF;
 background: -webkit-gradient(linear, left top, left bottom, from(#fff), to(#cbd4e5));
 background: -moz-linear-gradient(top,  #fff,  #cbd4e5);
 filter:  progid:DXImageTransform.Microsoft.gradient(startColorstr='#fff', endColorstr='#cbd4e5');
}
.reg_form p{
 width: 300px;
 clear: left;
 margin: 0;
 padding: 5px 0 8px 0;
 padding-left: 155px;
 border-top: 1px dashed gray;
 height: 1%;
}
.reg_form label{
 font-weight: bold;
 float: left;
 margin-left: -155px;
 width: 150px;
}
input,select{
 padding:3px;
 color:#333333;
 border:1px solid #96A6C5;
 margin-top:2px;
 width:180px;
 font-size:11px;
}
select{
 width:auto;
 padding:2px;
}
.greenButton{
 width:auto;
 margin:10px 0 0 2px;
 padding:3px 4px 3px 4px;
 color:white;
 background-color:#589d39;
 outline:none;
 border:1px solid #006600;
 font-weight:bold;
}
.greenButton:active{
 background-color:#006600;
 padding:4px 3px 2px 5px;
}

Download Source Code
Read more ...

Captcha in Codeigniter with session

Friday, March 2, 2012
In this tutorial I will show you how to use the the codeigniter captcha helper. I use the session to save the captcha data instead of database.

Configuration

Download the CI latest version form codeigniter.com. Extract and rename as ci_captcha.

Open application/config/database.php, and change the following database configuration to fit your mysql configuration.

$config['hostname'] = “localhost”;

$config['username'] = “myusername”;

$config['password'] = “mypassword”;

$config['database'] = “mydatabase”;

$config['dbdriver'] = “mysql”;

Then open application/config/config.php

$config['base_url'] = ‘http://localhost/ci_captcha/’;

$config['encryption_key'] = '1234';

Open application/config/autoload.php

$autoload['libraries'] = array('database’,'session');

and

$autoload['helper'] = array(’form’);

Open application/config/routes.php, change default controller to home controller that we’ll create later on this tutorial.

$route['default_controller'] = ‘home’;

The last thing we need to do for this step is create a folder called captcha under the ci_captcha folder.

Creating Database table

We need to create a table in our database. Import following SQL statement via phpMyAdmin or any other MySQL tool.

CREATE TABLE `message` (
`id` INT( 50 ) NOT NULL AUTO_INCREMENT ,
`username` VARCHAR( 50 ) NOT NULL ,
`message` TEXT NOT NULL ,
PRIMARY KEY ( `id` )
) ENGINE = InnoDB

Controller

Create a blank document in the controller file (application -> controller) and name it home.php, in the document add all the following code.

<?php if ( ! defined('BASEPATH')) exit('No direct script access allowed');
class Home extends CI_Controller {
 public function __construct()
 {
  parent::__construct();
  $this->load->model('home_model');
 }
 public function index()
 {
  $this->load->helper('captcha');
  $vals = array(
     'img_path' => './captcha/',
     'img_url' => 'http://localhost/ci_captcha/captcha/'
     );
  $cap = create_captcha($vals);
  $data = array(
     'captcha_time' => $cap['time'],
     'ip_address' => $this->input->ip_address(),
     'word' => $cap['word']
     );
  $this->session->set_userdata($data);
  $data['cap_img']=$cap['image'];
  $this->load->view('form_view',$data);
 }
 public function add_message()
 {
  $this->load->library('form_validation');
  // field name, error message, validation rules
  $this->form_validation->set_rules('user_name', 'User Name', 'trim|required|min_length[3]');
  $this->form_validation->set_rules('message', 'Message', 'trim|required|xss_clean');
  $this->form_validation->set_rules('captcha', 'Security Code', 'trim|required|callback_check_captcha');
  if($this->form_validation->run() == FALSE)
  {
   $this->index();
  }
  else
  {
   $this->home_model->add_message();
  }
 }
 public function check_captcha()
 {
  $expiration = time()-7200; // Two hour limit
  $cap=$this->input->post('captcha');
  if($this->session->userdata('word')== $cap 
   AND $this->session->userdata('ip_address')== $this->input->ip_address()
   AND $this->session->userdata('captcha_time')> $expiration)
  {
   return true;
  }
  else{
   $this->form_validation->set_message('check_captcha', 'Security number does not match.');
   return false;
  }
 }
}
?>

View

Create a blank document in the views file (application -> views) and name it form_view.php, in the document add all the following code.

<!DOCTYPE html PUBLIC "-//W3C//DTD XHTML 1.0 Transitional//EN" "http://www.w3.org/TR/xhtml1/DTD/xhtml1-transitional.dtd">
<html xmlns="http://www.w3.org/1999/xhtml">
<head>
<meta http-equiv="Content-Type" content="text/html; charset=utf-8" />
<title>Captcha in Codeigniter</title>
</head>
<body>
 <?php echo validation_errors('<p>'); ?>
 <?php echo form_open("home/add_message"); ?>
 <p>
  <label for="user_name">Name:</label>
  <input type="text" id="user_name" name="user_name" value="<?php echo set_value('user_name'); ?>" />
 </p> 
 <p>
  <label for="con_password">Message:</label>
  <textarea name="message" id="message" value="" cols="50" rows="4"></textarea>
 </p> 
 <p>
  <?php echo $cap_img ?>
  <input type="text" id="captcha" name="captcha" value="" />
 </p> 
 <p>
  <input type="submit" value="Submit" />
 </p>
 <?php echo form_close(); ?>
</body>
</html>

Model

Create a blank document in the models file (application -> models) and name it home_model.php, in the document add all the following code.

<?php if ( ! defined('BASEPATH')) exit('No direct script access allowed');
class Home_model extends CI_Model {
 public function __construct()
 {
  parent::__construct();
 }
 public function add_message()
 {
  $data=array(
     'username'=>$this->input->post('user_name'),
     'message'=>$this->input->post('message'),
     );
  $this->db->insert('message',$data);
 }
}
?>

Now you have done a from with captcha. All above code is easy to follow and understand, isn't it? But if you have some trouble, don't hesitate to asked me.
Read more ...

Codeigniter Pagination

Sunday, February 26, 2012
This tutorial is part 2 of the tutorial series Building Website with CI.

In this part 2 will explain you about Codeigniter Pagination Class.

What is Pagination?

If you are not familiar with the term "pagination", it refers to links that allows you to navigate from page to page, like this:


We crated a site like facebook in the part 1 (How to start with CI?). In this part we will add the pagination to our site.

Controller

I added some chunk of code to our controller index function like following.

public function index()
    {
        $data['base']=$this->config->item('base_url');
        $data['title']= 'Message form';
        $this->load->model("message_model");

        $total=$this->message_model->message_count();
        $per_pg=5;
        $offset=$this->uri->segment(3);

        $this->load->library('pagination');
        $config['base_url'] = $data['base'].'/index.php/home/index/';
        $config['total_rows'] = $total;
        $config['per_page'] = $per_pg;
        $config['full_tag_open'] = '<div id="pagination">';
        $config['full_tag_close'] = '</div>';

        $this->pagination->initialize($config);
        $data['pagination']=$this->pagination->create_links();

        $data['query']=$this->message_model->get_all($per_pg,$offset);
        $this->load->view('header_view',$data);
        $this->load->view('messageform_view',$data);
        $this->load->view('footer_view',$data);
    }

Don't worry if you don't understand above code. I will explain you.

The first line I have added is

$total=$this->message_model->message_count();

This line will grab the total number of rows from our database table. To get the total number of rows, we have to add the message_count() function to our message_model model. I will show you writing message_count() function in our model section. Now we have got the total number of rows from our database table.

Next we create a variable $per_pg for our pagination class. This variable is to adjust how many rows to display in each page.

Next we read the value of the third segment of the URI which is the current offset number to a variable called $offset. If the segment is empty the we set the value as 0.

Here we need to understand about CI URLs structure. CI’s URLs usually take the following form,

www.examlple.com/index.php/class/function/ID,

so as you can see the 3rd segment (after index.php) represents the ID. So lets take for example the following URL:

http://www.example.com/index.php/home/index/5

The ID number will depend on our $per_pg ( per page) variable. If we set the per page as 5, our ID number will go 5,10,15,... If we set the per page as 10, our ID number will go 10,20,30,... So this is offset value for our database query.

Next we load the pagination library. It is required if you will be accessing any of its methods.

Next we need to set the values to config our pagination.
$config['base_url'] = $data['base'].'/index.php/home/index/';
First one is base_url that the base URL of the web page to be paginated. Base URL from config file and concatenated to that is the remainder of the URL necessary to reference the web page to be paginated.
$config['total_rows'] = $total;
We have already got this variable as $total. So set it up.
$config['per_page'] = $per_pg;
We have already created this one first so set it up.
$config['full_tag_open'] = '<div id="pagination">';
$config['full_tag_close'] = '</div>';

Above two lines are for our pagination design. First one will appear before the pagination link and second one will appear after the pagination link.

$this->pagination->initialize($config);
$data['pagination']=$this->pagination->create_links();
In above two lines, first one is initialize our pagination class. Second one is create a link and return the value and set it to our $data variable array as pagination variable. We will use this variable in our view file.

In part 1 of our controller, we grab all data from our database like this:

$data['query']=$this->message_model->get_all();

To add the pagination, we need to pay the limit and offset as the parameters for our database query.

Limit determine how many rows we want to grab from our database table or how many rows to display in each page and offset which will it what row to start returning results from.

So our code will be look like this
$data['query']=$this->message_model->get_all($per_pg,$offset);
Rest of our code is like part 1.

Model

I rewrote the get_all() function and added message_count() function to count the total rows from our message table like following.

public function get_all($per_pg,$offset)
    {
 $this->db->order_by('id','desc');
        $query=$this->db->get('message',$per_pg,$offset);
        return $query->result();
    }
    public function message_count()
    {
        return $this->db->count_all('message');
    }

As you saw in the controller the method will have two arguments, one for the limit or per page and the other for the offset. So you will notice we called the two arguments to get_all(), $per_pg and $offset respectively. $per_pg specifies the number of results to retrieve from the database and $offset specifies where it should start retrieving results from.
$this->db->order_by('id','desc');
The above code will produce the following query in MySQL:
ORDER BY id DES
$this->db->get('message',$per_pg,$offset);
The above code will produce the following query in MySQL:
SELECT * FROM message LIMIT 5, 0

So because of these two lines, query in MySQL will be: SELECT * FROM message ORDER BY id DESC LIMIT 5, 0

And then I will explain you about message_count() function.
public function message_count()
{
     return $this->db->count_all('message');
}
It is so clear. It will return the number of rows in a particular table as an integer. Submit the table name in the parameter.

View

In view file, we only need to do is echoing our pagination variable in a rightful place. So we have to add below code after the foreach loop in our messageform_view view file.

echo $pagination;

Styling with css

We should add some style to our style.css for our pagination. We wrapped the pagination with div id named pagination in our controller. So add below css code to our style.css.

#pagination{
    float: left;
    font:11px Tahoma, Verdana, Arial, "Trebuchet MS", Helvetica, sans-serif;
    color:#3d3d3d;
    margin-top: 20px;
    margin-left:auto;
    margin-right:auto;
    margin-bottom:20px;
    width:100%;
}
#pagination a, #pagination strong{
    list-style-type: none;
    display: inline;
    padding: 5px 8px;
    text-decoration: none; 
    background-color: inherit;
    color: #EC7117;
    font-weight: bold;
}
#pagination strong{
    color: #ffffff;
    background-color:#F00;
    background-position: top center;
    background-repeat: no-repeat;
    text-decoration: none; 
}
#pagination a:hover{
    color: #ffffff;
    background-color:#F00;
    background-position: top center;
    background-repeat: no-repeat;
    text-decoration: none; 
}

Now you can run your site. Next tutorial we will do the form validation with CI.
Download Source Code
Read more ...

How to start with Codeigniter?

Friday, February 24, 2012
If you have an experience with PHP two or three project, you should speed up your coding time with CI. CI will give you more easy life with PHP. CI uses the Model View Controller architectural pattern which gives you great flexibility when it comes to reusing, altering and upgrading code. When I write this tutorial CI version is 2.0.2. It is little different form older version. Because It support PHP 5.1.6 and newer.

Requirement

CodeIgniter

Step 1: Configuration

Download CI latest version from its official site. You will get zip file. Extract it to your sever host and rename your folder as mycisite.
Inside our mycisite folder you will found three folder and two file. You don't need to touch any folder except application folder.Open your application folder. You will see many folder and two file. Now for this step open config folder and then open config.php with your favourite editor. In line 17 you will see this code

$config['base_url'] = '';

Add your site url between single quote like following

$config['base_url'] = 'http://localhost/mycisite/';

Now you can run your site. If you run your site, you will see like following

Why? Open the mycisite>application>config>routes.php. In line 41 you will see like this

$route['default_controller'] = "welcome";

CI call mycisite>application>controllers>welcome.php as a default controller because of above line. We will write a home.php as default controller so change the controller name as following

$route['default_controller'] = "home";

We will also do the configuration for database. So open mycisite>application>config>database.php. From line 44 you will see like following

$db['default']['hostname'] = 'localhost';
$db['default']['username'] = '';
$db['default']['password'] = '';
$db['default']['database'] = '';
$db['default']['dbdriver'] = 'mysql';
$db['default']['dbprefix'] = '';
$db['default']['pconnect'] = TRUE;
$db['default']['db_debug'] = TRUE;
$db['default']['cache_on'] = FALSE;
$db['default']['cachedir'] = '';
$db['default']['char_set'] = 'utf8';
$db['default']['dbcollat'] = 'utf8_general_ci';
$db['default']['swap_pre'] = '';
$db['default']['autoinit'] = TRUE;
$db['default']['stricton'] = FALSE;

We need to set the hostname, username, password and database. Before you set the database, you should create a database from phpmyadmin. I create a database name as cidata. So our database setting is like that

$db['default']['hostname'] = 'localhost';
$db['default']['username'] = 'your_username';
$db['default']['password'] = 'your_password';
$db['default']['database'] = 'cidata';

Step 2:Creating our database table

The database need just one table with just 4 fields id (int 10), name (varchar 50), email (varchar 50) and message (text). Import following SQL statement via phpMyAdmin or any other MySQL tool.

CREATE TABLE `message` (
`id` int( 10 ) NOT NULL AUTO_INCREMENT ,
`name` varchar( 50 ) NOT NULL ,
`email` varchar( 50 ) NOT NULL ,
`message` text NOT NULL ,
PRIMARY KEY ( `id` )
) ENGINE = InnoDB DEFAULT CHARSET = latin1 AUTO_INCREMENT =1;

Step 3:Calling Message Form View from Controller

Now it is time to write our home.php controller. Open a new file in your editor and then copy and paste following code and save this file as mycisite>application>controllers>home.php.

<?php if ( ! defined('BASEPATH')) exit('No direct script access allowed');

class Home extends CI_Controller{

    public function __construct(){
        parent::__construct();

    }

    public function index()
    {
        echo "Hello world!";
    }
}
?>

If you run the site you will see Hello world! in your browser. It means function index is the default function for our controller. Now obviously we don't actually want it to output "Hello World!" so we can go ahead and delete that and start building it up properly. So we will call the message form as a default.

<?php if ( ! defined('BASEPATH')) exit('No direct script access allowed');

class Home extends CI_Controller{

    public function __construct(){
        parent::__construct();

    }

    public function index()
    {
        $data['base']=$this->config->item('base_url');
        $data['title']= 'Message form';
        $this->load->view('header_view',$data);
        $this->load->view('messageform_view',$data);
        $this->load->view('footer_view',$data);
    }
}
?>

We need to set the value for the $data variable array. Firstly we set our base url as a base variable. The code of $this->config->item('base_url') will grab our url data from the application>config>config.php file. Another one is the title for our form view. You can use this data in the view file as a $base or $title. So we should pay the meaningful name in our $data variable array. Then we load three view files for our message form. Why is it three? Because header and footer will include every view file. So we should do as the separate file.

Step 4: Creating Message Form View

Open a new file in your editor and let's start our header_view.php. This file is very simple for our simple project.Below is our header_view.php. Save this view file as mycisite>application>view>header_view.php.

<!DOCTYPE html PUBLIC "-//W3C//DTD XHTML 1.0 Transitional//EN" "http://www.w3.org/TR/xhtml1/DTD/xhtml1-transitional.dtd">
<html xmlns="http://www.w3.org/1999/xhtml">
<head>
<meta http-equiv="Content-Type" content="text/html; charset=utf-8" />
<title><?php echo (isset($title)) ? $title : "My CI Site" ?> </title>
<link rel="stylesheet" type="text/css" href="<?php echo $base ?>css/style.css" />
</head>
<body>
    <div id="wrapper">

You will notice that our title is called dynamically. $title variable is from our $data variable array. Behind the scenes, CI makes good use of another PHP function: extract(). This takes each value in the $data array and turns it into a new variable in its own right -so the $data array that we have just define is receive by the view as a series of separate variables: $title, $base, and so on. We use the $base variable to call the style.css file. We need to create a css folder to put our css file separately. So create a folder under the mycisite folder name as css. We don't need to write the end tag for body, html, div wrapper because we will write this end tag in our footer_view.php file. Following is our footer_view.php. Save this view file as mycisite>application>view>footer_view.php.

</div><!--<div id="wrapper">-->
</body>
</html>

It is simple, isn't it?
Now let's start our messageform_view.php. Following is our messageform_view.php. Save this view file as mycisite>application>view>messageform_view.php.

<div id="content">
<?php $this->load->helper('form'); ?>
<?php echo form_open("home/insert_message"); ?>
    <p>
        <label for="name">Name: </label>
        <input type="text" name="name" id="name" value="" size="30" />
    </p>
    <p>
        <label for="email">E-mail: </label>
        <input type="text" name="email" id="email" value="" size="30" />
    </p>
    <p>
        <label for="message">Message: </label>
        <textarea name="message" id="message" value="" cols="50" rows="4"></textarea>
    </p>
    <p>
    <input type="submit" value="Submit" />
    </p>
<?php echo form_close(); ?>
</div><!--<div id="content">-->

Firstly we need to load the form helper because we will use the CI form helper for our html form. CI has many helper for you to reduce the coding and more flexible. You can also create your own helper. If you were using plain HTML code, you'd write:
<form method="post" action="http:/www.mysite.com/index.php/websites/update" />
Whereas, if you open your form with CI, you only need to use:
form_open(home/insert_message)

If you don't understand the action link, don't worry I will explain you later.

Note incidentally, that CI assumes your forms will always send POST data rather than GET data. CI makes extensive use of the URLs itself, so this avoids confusion.

At the end of the form you need to close the form with form_close(); function. Run your site. You will see the the message form.

Step 5: Creating the insert_message function for our Controller

In our home Controller, we need to add the insert_message() function for our form submitting. Following is our home.php with insert_message() function.

<?php if ( ! defined('BASEPATH')) exit('No direct script access allowed');

class Home extends CI_Controller{

    public function __construct(){
        parent::__construct();

    }

    public function index()
    {
        $data['base']=$this->config->item('base_url');
        $data['title']= 'Message form';
        $this->load->view('header_view',$data);
        $this->load->view('messageform_view',$data);
        $this->load->view('footer_view',$data);
    }
    public function insert_message()
    {
        $this->load->model('message_model');
        $this->message_model->add_message();
    }
}
?>

Firstly we load the model message_model(next step we will create this model). And then we call the add_message() function from our message_model model.

Step 6:Creating the message_model model

It is time to create our model. Following is our message_model.php. Save this model file as mycisite>application>model>message_model.php.

<?php
if ( ! defined('BASEPATH')) exit('No direct script access allowed');

class Message_model extends CI_Model {

    public function __construct()
    {
        parent::__construct();
        $this->load->database();
    }
    public function add_message()
    {
        $data=array(
            'name'=>$_POST['name'],
            'email'=>$_POST['email'],
            'message'=>$_POST['message']
            );
        $this->db->insert('message',$data);
    }
}
?>

In our model constructor, we need to load the database library like:
$this->load->database();
CI also has many libraries. You can also learn from its user_guide inside our project folder.

Alternatively instead of loading the library in each individual model we can open autoload.php (system -> application -> config -> autoload.php) the first array we come across is the one which we want.
$autoload['libraries'] = array();
You need to put the names of each of the libraries you want in the array as single entites.
$autoload['libraries'] = array('database');
The second function is add_message() function. Remember we called the add_message() function from our controller to add our data into our database. Firstly we create the $data array. Left side is field names from our database and right side is names from our form. This line $this->db->insert('message',$data); will insert the data into our database. First parameter is our table name and second is our data. It is very to use, isn't it? Now you can run your site. If you submit the form, our data will insert into our database but our browser will be blank. So we need to redirect our site into somewhere. For this project I will redirect into our form page.

Step 7:Redirecting our page

To redirect our page, we need to call the url helper like this

$this->load->helper('url');

Now we can use redirect function like this

redirect("/home/index");

You only need to give the parameter for this function is controller name and function name. CI will do the rest. Now submit our form. You will see the form again and also fill with data into our database. Next step we will show the inserted data below the form like facebook.com.

Step 8:Creating get_all database function

To show our all message below the submit form, we need to grab all data from our database. Below function will grab the all data. Add this function to your model file.

public function get_all()
    {
        $query=$this->db->get('message');
        return $query->result();
    }

CI get() db function will grab all data from the message table. This function will return the result as an object. And then we will return the result object by using result() function. If you more prefer array form you can return array like following

return $query->result_array();

Step 9:Calling data grabbing function from our Controller

Firstly we need to load our model. And then we need to call the function that we have created already. When we call the function we need to set the return data to our data array. So following is our needed code

$this->load->model("message_model");
    $data['query']=$this->message_model->get_all();

We will add above code to the appropriate place. This place is before loading view. So our index function will be like following

public function index()
    {
        $data['base']=$this->config->item('base_url');
        $data['title']= 'Message form';
        $this->load->model("message_model");
        $data['query']=$this->message_model->get_all();
        $this->load->view('header_view',$data);
        $this->load->view('messageform_view',$data);
        $this->load->view('footer_view',$data);
    }

Step 10:Displaying message below our message form

Add the following code below your form closing function in your view.

<?php
foreach($query as $row)
{
?>
    <div>
        <?php echo $row->name; ?>: Says
    </div>

    <div>
        <?php echo $row->message; ?>
    </div>
    <br />
<?php
}
?>

This is a straight forward foreach loop looping through each of the object entities and echoing the message in our view. Now you can run your site. It will show the all message below the message form.

Step 11:Designing our site with CSS

Below is our css code for our site. Save this css file as mycisite>css>style.css.

@charset "utf-8";
/* CSS Document */
body{
    background-color:#FFF;
    font-family:Monaco,Consolas,'Lucida Grande','Lucida Console';
    font-size:16px;
    text-shadow:rgba(0,0,0,0.01) 0 0 0;
}
#wrapper{
    width:960px;
    margin:0 auto;
}
#content{
    width:620px;
    margin:5px;
    float:left;
}
.message_form{
    width:520px;
    padding:20px 20px 0px 40px;
    border:1px dashed #A0A0A4;
}
.name_field label, .mail_field label, .message_field label{
font-weight: bold;
}
.message_field label{
    float: left;
}
.name_field{
    width:250px;
    float:left;
}
.mail_field{
    width:250px;
    float:left;
}
.message_form input[type="text"]{
    width: 170px;
}
.message_form textarea{
width: 490px;
height: 70px;
}
.message_show{
    border-bottom:1px dashed #A0A0A4;
}

Run your site. Below is my screenshot. Next tutorial we will add Pagination.

Download Source Code
Read more ...

Creating menu from database data

Saturday, February 11, 2012
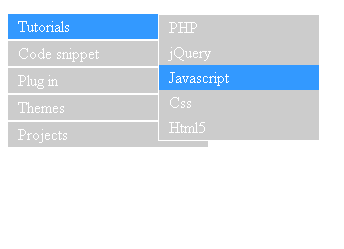
This post will walk you through a detailed tutorial on how to make a vertical menu system from our categories that stored in database. In this script, when the user add the new categories dynamically, the system will render the added categories as the menu items automatically. Below is our final result screenshot.

Firstly, we need to create a database. I named it as catmenu and below is our categories table for our menu system.
CREATE TABLE IF NOT EXISTS `categories`
`cat_id` int(5) NOT NULL AUTO_INCREMENT,
`cat_name` varchar(255) NOT NULL,
`parent_id` int(5) NOT NULL,
PRIMARY KEY (`cat_id`)
) ENGINE=InnoDB  DEFAULT CHARSET=latin1;
The next thing we need to do is to create a form to add our menu data from our site dynamically.
Open new document and type below code and save as category.php
<!DOCTYPE html>
<html>
<head>
 <title>Adding category for menu</title>
</head>
<body>
<?php
 if(isset($_POST['submit']))
 {
  $parent_name=addslashes($_POST['parent_name']);
  $cat_name=addslashes($_POST['cat_name']);
  mysqli=mysqli_connect('localhost','root','','catmenu');
  $sql="INSERT INTO categories(cat_name, parent_id) VALUES ('$cat_name', '$parent_name')";
  $result=mysqli_query($mysqli,$sql);
  if($result){
   header("location: category.php");
   exit; 
  }
 }
?> 
<form class="cat_form" id="cat_form" method="post" action="category.php" >
 <p>
  <label>Parent:</label>
  <?php
   $mysqli=mysqli_connect('localhost','root','','catmenu');
   $sql="SELECT cat_id,cat_name FROM categories WHERE parent_id=0";
   $result=mysqli_query($mysqli,$sql);
   echo "<select name='parent_name' id='parent_name' length='15'>";
   echo "<option  value='0'>Root</option>";
   while($row=mysqli_fetch_array($result)){
     $cat_id=$row['cat_id'];
     $cat_name=$row['cat_name'];
     echo "<option value=".$cat_id." >".$cat_name."</option>";
   }
   echo "</select>";
  ?>
 </p>
 <p>
  <label>Category Name:</label>
  <input type="text" id="cat_name" name="cat_name" />
 </p>
 <p>
  <input type="submit" value="Add" name="submit" />
 </p>
</form>
</body>
</html>
If you load this script in your browser, you will see like below. Type the category name for our menu in the text box.

I type it as Tutorials and click Add button. You will see this form again. Now you can choose your parent category from Parent drop down list if you want to add as a sub menu like below.

I also add some menu data for my site and now it is time to write a index.php for our site. Below is our index.php.
<!DOCTYPE html>
<html>
  <head>
   <title>Vertical menu</title>
  <style type="text/css">
  #navigation {
   width:200px; 
   float:left; 
   margin-top:5px;
  }
  #navigation ul{
   margin:0px; 
   padding:0px; 
   background-color: #CCC;
  }
  #navigation ul li {
     height:25px;
   line-height:25px;
   list-style:none;
   padding-left:10px;
   border-top:#fff solid;
   border-bottom:#fff solid;
   border-width:1px;
   cursor:pointer;
  }
  #navigation ul li a{
   text-decoration:none;
   color: #fff;
  }
  #navigation ul li:hover{
   background-color: #39F; 
   position:relative;
  }
  #navigation ul ul {
   display:none;
   position:absolute;
   left:150px;
   top:0px;
   border:#fff solid;
   border-width:1px;
   background-color: #CCC;
  } 
  #navigation ul li:hover ul {
   display:block;
  }
  #navigation ul ul li {
   border:none; 
   width:150px; 
   float:left; 
   display:inline;
  }
  #navigation ul ul li:hover {
   border:none;
  }
  </style>
  </head>
  <body>
  <div id="navigation">
  <ul>
  <?php
   $mysqli=mysqli_connect('localhost','root','','catmenu');
   $sql="SELECT * FROM categories WHERE parent_id = 0";
   $result=mysqli_query($mysqli,$sql) or die(mysqli_error());
   while($row=mysqli_fetch_array($result)){
    $cat_id=$row['cat_id'];
    $cat_name=$row['cat_name'];
    echo "<li>
    <a href='index.php?cat=$cat_id'>".$cat_name."</a>";
    echo "<ul>";
    $sql2="SELECT * FROM categories WHERE parent_id=$cat_id and cat_id<>0";
    $result2=mysqli_query($mysqli,$sql2) or die(mysqli_error());

    while($row=mysqli_fetch_array($result2)){
     $sub_cat_id=$row['cat_id'];
     $sub_cat_name=$row['cat_name'];
     echo "<li><a href='index.php?cat=$sub_cat_id'>".$sub_cat_name."</a></li>";
    }
    echo "</ul>";
    echo "</li>";
  
   }
  ?>
  </ul>
  </div>
  </body>
</html>
If you run this site you will see like below but can change according our menu items that added in the above form.
Read more ...

PHP tag cloud

Tuesday, February 7, 2012
In this tag cloud, I use only PHP and css. I don't want to explain what is tag cloud because I think you will be familiar with it and you will know how it is useful. Let's talk about how to make a tag cloud.

We need some information from our database. So you need to create a database by using below sql script.
CREATE TABLE IF NOT EXISTS `tags` (
  `id` bigint(50) NOT NULL AUTO_INCREMENT,
  `tag_name` text NOT NULL,
  `frequency` int(50) NOT NULL,
  PRIMARY KEY (`id`)
) ENGINE=InnoDB  DEFAULT CHARSET=latin1 AUTO_INCREMENT=14 ;
--
-- Dumping data for table `tags`
--
INSERT INTO `tags` (`id`, `tag_name`, `frequency`) VALUES
  (1, 'PHP', 100),
  (2, 'ASP', 10),
  (3, 'jQuery', 50),
  (4, 'Codeigniter', 100),
  (5, 'MySql', 50),
  (6, 'Google', 5),
  (7, 'Javascript', 7),
  (8, 'hardware', 4),
  (9, 'Design', 80),
  (10, 'Ajax', 30),
  (11, 'wordpress', 10),
  (12, 'css3', 30),
  (13, 'mobile', 15);


Below is our script that generate tag cloud. How simple it is.
<!DOCTYPE html>
<html>
<head>
<title>Tags cloud</title>
<style type="text/css">
.tags_container{width:300px;padding:10px 10px;}
.tags ul{padding:5px 5px;}
.tags li{margin:0;padding:0;list-style:none;display:inline;}
.tags li a{text-decoration:none;padding:0 2px;}
.tags li a:hover{text-decoration:underline;} 

.tag1 a{font-size:12px; color: #9c639c;}
.tag2 a{font-size:14px; color: #cece31;}
.tag3 a{font-size:16px; color: #9c9c9c;}
.tag4 a{font-size:18px; color: #31ce31;}
.tag5 a{font-size:20px; color: #6363ad;}
.tag6 a{font-size:22px; color: #ce6300;}
.tag7 a{font-size:24px; color: #9c3100;}
</style>
</head>
<body>
<?php 
 $con = mysqli_connect("localhost", "root", "","tagcloud");
 $query = "SELECT MAX(frequency) as num FROM tags";
 $result = mysqli_query($con,$query);
 $max = mysqli_fetch_array($result);
 if($max['num'] <10) $max['num'] = 10;
?>
<div id="content">
<div class="tags_container">
 <ul class="tags">
 <?php
  $factor = $max['num']/7;
  $query = "SELECT * FROM tags";
  $result = mysqli_query($con,$query);
  while($row=mysqli_fetch_array($result)){
   for($i=0; $i<=6; $i++)
   {
    $start = $factor * $i;
    $end = $start + $factor;
    if($row['frequency'] > $start && $row['frequency'] <= $end)
    {
     $tag_number = $i+1;
    }
   }
 ?>
  <li class="tag<?php echo $tag_number; ?>">
   <a href="#">
    <?php echo $row['tag_name']; ?>
   </a>
  </li>
 <?php
  }
 ?>
 </ul>
</div>
</div>
</body>
</html>
Below is the screenshot of our tag cloud.

In this script you can easily control your tag cloud appearance. You can change your tag color and font size by changing some css code.

You can also change the numbers of style that you want to use in your tag cloud by changing when you find the factor. If you want to use 10 tag style, you will divide by 10 and in for loop change 6 to 9.

If you want to order your tags according to the frequency, only thing you need to do is changing query string like below.
$query = "SELECT * FROM tags order by frequency desc";
Read more ...

PHP installation script

Thursday, February 2, 2012
In this post, we will discuss about installation script for our web site or web application. I divided into four functions for four steps.

Before we do the first step, we need some code to call our functions according to the url.
Open new document in your favourite editor and type below code and save as install.php

<!DOCTYPE html>
<html>
<head>
<title>Installation Script</title>
</head>
<?php
$step = (isset($_GET['step']) && $_GET['step'] != '') ? $_GET['step'] : '';
switch($step){
  case '1':
  step_1();
  break;
  case '2':
  step_2();
  break;
  case '3':
  step_3();
  break;
  case '4':
  step_4();
  break;
  default:
  step_1();
}
?>
<body>

Step 1

Step one is for license agreement. If the user agree to our license, we will call the step two. Type below code, in our install.php.

<?php
function step_1(){ 
 if($_SERVER['REQUEST_METHOD'] == 'POST' && isset($_POST['agree'])){
  header('Location: install.php?step=2');
  exit;
 }
 if($_SERVER['REQUEST_METHOD'] == 'POST' && !isset($_POST['agree'])){
  echo "You must agree to the license.";
 }
?>
 <p>Our LICENSE will go here.</p>
 <form action="install.php?step=1" method="post">
 <p>
  I agree to the license
  <input type="checkbox" name="agree" />
 </p>
  <input type="submit" value="Continue" />
 </form>
<?php 
}
You need to do some design for your site. I don't do anything for that.

Step 2

In step two, we will test the requirement for our site or application.

function step_2(){
  if($_SERVER['REQUEST_METHOD'] == 'POST' && $_POST['pre_error'] ==''){
   header('Location: install.php?step=3');
   exit;
  }
  if($_SERVER['REQUEST_METHOD'] == 'POST' && $_POST['pre_error'] != '')
   echo $_POST['pre_error'];
      
  if (phpversion() < '5.0') {
   $pre_error = 'You need to use PHP5 or above for our site!<br />';
  }
  if (ini_get('session.auto_start')) {
   $pre_error .= 'Our site will not work with session.auto_start enabled!<br />';
  }
  if (!extension_loaded('mysql')) {
   $pre_error .= 'MySQL extension needs to be loaded for our site to work!<br />';
  }
  if (!extension_loaded('gd')) {
   $pre_error .= 'GD extension needs to be loaded for our site to work!<br />';
  }
  if (!is_writable('config.php')) {
   $pre_error .= 'config.php needs to be writable for our site to be installed!';
  }
  ?>
  <table width="100%">
  <tr>
   <td>PHP Version:</td>
   <td><?php echo phpversion(); ?></td>
   <td>5.0+</td>
   <td><?php echo (phpversion() >= '5.0') ? 'Ok' : 'Not Ok'; ?></td>
  </tr>
  <tr>
   <td>Session Auto Start:</td>
   <td><?php echo (ini_get('session_auto_start')) ? 'On' : 'Off'; ?></td>
   <td>Off</td>
   <td><?php echo (!ini_get('session_auto_start')) ? 'Ok' : 'Not Ok'; ?></td>
  </tr>
  <tr>
   <td>MySQL:</td>
   <td><?php echo extension_loaded('mysql') ? 'On' : 'Off'; ?></td>
   <td>On</td>
   <td><?php echo extension_loaded('mysql') ? 'Ok' : 'Not Ok'; ?></td>
  </tr>
  <tr>
   <td>GD:</td>
   <td><?php echo extension_loaded('gd') ? 'On' : 'Off'; ?></td>
   <td>On</td>
   <td><?php echo extension_loaded('gd') ? 'Ok' : 'Not Ok'; ?></td>
  </tr>
  <tr>
   <td>config.php</td>
   <td><?php echo is_writable('config.php') ? 'Writable' : 'Unwritable'; ?></td>
   <td>Writable</td>
   <td><?php echo is_writable('config.php') ? 'Ok' : 'Not Ok'; ?></td>
  </tr>
  </table>
  <form action="install.php?step=2" method="post">
   <input type="hidden" name="pre_error" id="pre_error" value="<?php echo $pre_error;?>" />
   <input type="submit" name="continue" value="Continue" />
  </form>
<?php
}
I add some requirement as the sample. You should change according to your requirement.

Step 3

In step three, we need to create the config file and database for our site. And we will also save admin name and password in our database. To do so, our site users will fill their database information and admin information. You can also add other information that you need for your site.
function step_3(){
  if (isset($_POST['submit']) && $_POST['submit']=="Install!") {
   $database_host=isset($_POST['database_host'])?$_POST['database_host']:"";
   $database_name=isset($_POST['database_name'])?$_POST['database_name']:"";
   $database_username=isset($_POST['database_username'])?$_POST['database_username']:"";
   $database_password=isset($_POST['database_password'])?$_POST['database_password']:"";
   $admin_name=isset($_POST['admin_name'])?$_POST['admin_name']:"";
   $admin_password=isset($_POST['admin_password'])?$_POST['admin_password']:"";
  
  if (empty($admin_name) || empty($admin_password) || empty($database_host) || empty($database_username) || empty($database_name)) {
   echo "All fields are required! Please re-enter.<br />";
  } else {
   $connection = mysql_connect($database_host, $database_username, $database_password);
   mysql_select_db($database_name, $connection);
  
   $file ='data.sql';
   if ($sql = file($file)) {
   $query = '';
   foreach($sql as $line) {
    $tsl = trim($line);
   if (($sql != '') && (substr($tsl, 0, 2) != "--") && (substr($tsl, 0, 1) != '#')) {
   $query .= $line;
  
   if (preg_match('/;\s*$/', $line)) {
  
    mysql_query($query, $connection);
    $err = mysql_error();
    if (!empty($err))
      break;
   $query = '';
   }
   }
   }
   @mysql_query("INSERT INTO admin SET admin_name='".$admin_name."', admin_password = md5('" . $admin_password . "')");
   mysql_close($connection);
   }
   $f=fopen("config.php","w");
   $database_inf="<?php
     define('DATABASE_HOST', '".$database_host."');
     define('DATABASE_NAME', '".$database_name."');
     define('DATABASE_USERNAME', '".$database_username."');
     define('DATABASE_PASSWORD', '".$database_password."');
     define('ADMIN_NAME', '".$admin_name."');
     define('ADMIN_PASSWORD', '".$admin_password."');
     ?>";
  if (fwrite($f,$database_inf)>0){
   fclose($f);
  }
  header("Location: install.php?step=4");
  }
  }
?>
  <form method="post" action="install.php?step=3">
  <p>
   <input type="text" name="database_host" value='localhost' size="30">
   <label for="database_host">Database Host</label>
 </p>
 <p>
   <input type="text" name="database_name" size="30" value="<?php echo $database_name; ?>">
   <label for="database_name">Database Name</label>
 </p>
 <p>
   <input type="text" name="database_username" size="30" value="<?php echo $database_username; ?>">
   <label for="database_username">Database Username</label>
 </p>
 <p>
   <input type="text" name="database_password" size="30" value="<?php echo $database_password; ?>">
   <label for="database_password">Database Password</label>
  </p>
  <br/>
  <p>
   <input type="text" name="admin_name" size="30" value="<?php echo $username; ?>">
   <label for="username">Admin Login</label>
 </p>
 <p>
   <input name="admin_password" type="text" size="30" maxlength="15" value="<?php echo $password; ?>">
   <label for="password">Admin Password</label>
  </p>
 <p>
   <input type="submit" name="submit" value="Install!">
  </p>
  </form>
<?php
}
According to our script, we need to crate a sql file. Open your Notepad and type blow sql script and save as data.sql in your project folder.
I create only admin table for the simplicity.
CREATE TABLE IF NOT EXISTS `admin` (
`admin_id` int(11) NOT NULL AUTO_INCREMENT,
`admin_name` varchar(50) NOT NULL,
`admin_password` varchar(50) NOT NULL,
PRIMARY KEY (`admin_id`)
) ENGINE=InnoDB DEFAULT CHARSET=latin1 AUTO_INCREMENT=1 ;

The next thing we need to do is to create a config.php file in your project folder. You don't need to do anything for this file save as blank.

Step 4

In this function, I only write tow link for our site home page and for admin page.
function step_4(){
?>
 <p><a href="http://localhost/installsample/">Site home page</a></p>
 <p><a href="http://localhost/installsample/admin">Admin page</a></p>
<?php 
}
?>

index.php

Below is our index.php file.
<!DOCTYPE html>
<html>
<head>
<title>Installation Script</title>
</head>
<body>
<?php
  require 'config.php';
  if (!defined('DATABASE_NAME')) {
   header('Location: install.php');
   exit;
  }
?>
  <p>This is our site.</p>
</body>
</html>
Below is some screenshot of our scritp.

Read more ...